Recipe of Ultimate "Chatsū" Japanese Confectionery

Recipe of Ultimate "Chatsū" Japanese Confectionery

"Chatsū" Japanese Confectionery.

"Chatsū" Japanese Confectionery

Hey everyone, it is John, welcome to my recipe page. Today, I will show you a way to make a special dish, "chatsū" japanese confectionery. One of my favorites food recipes. For mine, I will make it a little bit tasty. This will be really delicious.

"Chatsū" Japanese Confectionery is one of the most popular of recent trending foods in the world. It is easy, it is quick, it tastes delicious. It is enjoyed by millions daily. They are nice and they look wonderful. "Chatsū" Japanese Confectionery is something that I've loved my entire life.

To get started with this particular recipe, we have to prepare a few components. You can cook "chatsū" japanese confectionery using 10 ingredients and 16 steps. Here is how you can achieve it.

The ingredients needed to make "Chatsū" Japanese Confectionery:

  1. {Make ready 80 grams of ◎ Cake flour.
  2. {Take 2 tsp of ◎ Matcha.
  3. {Make ready 1/3 tsp of ◎ Baking powder.
  4. {Prepare 250 grams of Koshi-an.
  5. {Get 1 of Egg white.
  6. {Make ready 30 grams of Trehalose (or sugar).
  7. {Prepare 1 tbsp of Black sesame seeds.
  8. {Prepare 1/2 of teaspon Tea leaves (I used powdered green tea - konacha).
  9. {Take 2 tbsp of Cake flour for dusting.
  10. {Take 1/4 tsp of Vegetable oil.

Instructions to make "Chatsū" Japanese Confectionery:

  1. Roast the black sesame seeds..
  2. Combine the koshi-an and the roasted sesame seeds..
  3. Wrap it with plastic wrap (make it into a long stick about 20 cm)..
  4. Using a dough scraper, divide the koshi-an into 12 equal potions..
  5. Roll the koshi-an into balls..
  6. Mix the egg white and sugar until thick. Sift in the ◎ dry ingredients, and combine well with a spatula..
  7. Once the dough looks sticky like this, the mixing is done. Transfer to a dusted working surface..
  8. Roll out the dough into a flat stick about 20 cm long, and divide into 12 equal pieces with a dough scraper..
  9. Roll out the divided dough into balls..
  10. Dust your hands with flour and place the dough onto it. Stretch the dough out into a circle by gently patting it. [Important] Use a generous amount of flour to dust the dough or it will be sticky..
  11. Place the dough over the koshi-an. Flip it and start sealing the dough. [Important] If the dough starts to get sticky, dust with flour occasionally!.
  12. This dough is very elastic. So do not worry if it seems like the dough won't be enough to seal it. Just relax and slowly gather the dough and it will seal..
  13. Make a circle with your fingers and make an edge..
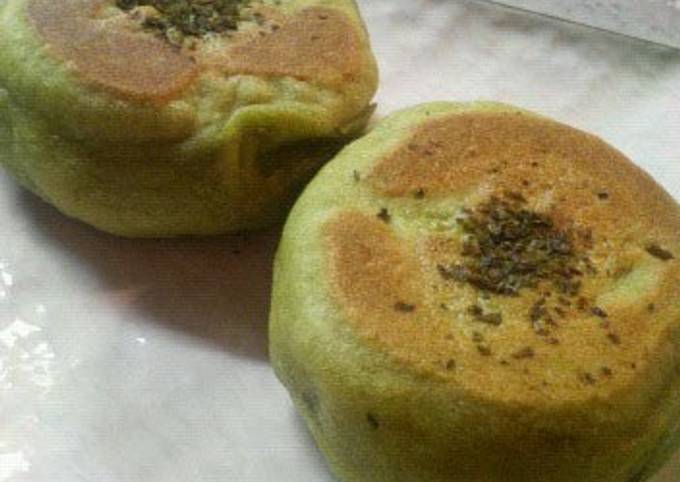
  14. Add the powdered green tea on top. Make sure to dust the container and place in the dough, so it won't stick to the container. If you are storing the dough, freeze it at this point without the powdered green tea..
  15. Heat the vegetable oil in a skillet over low heat, pan-fry the dough on the top-side first. Cook them slowly..
  16. Once they are golden brown, as shown in the photo, they are done..

So that is going to wrap it up for this exceptional food "chatsū" japanese confectionery recipe. Thank you very much for your time. I am confident you will make this at home. There is gonna be interesting food in home recipes coming up. Remember to save this page on your browser, and share it to your loved ones, friends and colleague. Thank you for reading. Go on get cooking!

Easiest Way to Make Any-night-of-the-week Lemon Garlic Parmesan Pasta

Easiest Way to Make Any-night-of-the-week Lemon Garlic Parmesan Pasta

Lemon Garlic Parmesan Pasta.

Lemon Garlic Parmesan Pasta

Hey everyone, I hope you're having an amazing day today. Today, I will show you a way to prepare a distinctive dish, lemon garlic parmesan pasta. One of my favorites food recipes. This time, I will make it a bit tasty. This will be really delicious.

Lemon Garlic Parmesan Pasta is one of the most favored of recent trending meals on earth. It is enjoyed by millions daily. It is simple, it's quick, it tastes yummy. They're nice and they look wonderful. Lemon Garlic Parmesan Pasta is something that I've loved my entire life.

To begin with this recipe, we must first prepare a few ingredients. You can have lemon garlic parmesan pasta using 8 ingredients and 5 steps. Here is how you cook it.

The ingredients needed to make Lemon Garlic Parmesan Pasta:

  1. {Prepare 1 tbsp of minced garlic.
  2. {Make ready 1 tbsp of butter.
  3. {Get 1 bag of uncooked shrimp (medium).
  4. {Get 1 tbsp of corn starch.
  5. {Get 2 cups of cooked noodles (your choice).
  6. {Get 3-4 cups of shredded parmesan cheese depending how cheesy you want.
  7. {Prepare 1/2 cup of milk or heavy cream.
  8. {Take 1/3 of Zest of lemon - about.

Instructions to make Lemon Garlic Parmesan Pasta:

  1. Start by melting butter in skillet. Once melted add garlic & cook til fragrant. Add shrimp & lemon juice, cook til shrimp is pinkish..
  2. Once shrimp is done, remove from skillet & set aside. Add to skillet your milk or heavy cream & 1 cup parmesan cheese, moving around so as to thicken & melt cheese..
  3. In a separate bowl mix corn starch & a half cup water. Now add to the ceenter of the skillet with your milk & cheese. Whisk until thickened..
  4. Once thickened reduce heat & add cooked pasta & shrimp back to the skillet with milk/heavy cream, cheese & corn starch. Toss until pasta is fully coated with sauce..
  5. Now add another cup of parmesan cheese to make a little cheesier & toss until cheese is stringy. Serve & enjoy!.

So that's going to wrap this up for this exceptional food lemon garlic parmesan pasta recipe. Thanks so much for your time. I'm confident that you will make this at home. There's gonna be interesting food at home recipes coming up. Remember to bookmark this page on your browser, and share it to your loved ones, friends and colleague. Thanks again for reading. Go on get cooking!

Easiest Way to Make Perfect Sweet Chilli Bacon Wrapped Chicken

Easiest Way to Make Perfect Sweet Chilli Bacon Wrapped Chicken

Sweet Chilli Bacon Wrapped Chicken.

Sweet Chilli Bacon Wrapped Chicken

Hello everybody, I hope you're having an incredible day today. Today, I'm gonna show you how to prepare a special dish, sweet chilli bacon wrapped chicken. One of my favorites food recipes. For mine, I will make it a little bit unique. This will be really delicious.

Sweet Chilli Bacon Wrapped Chicken is one of the most popular of recent trending foods on earth. It is simple, it's fast, it tastes delicious. It is enjoyed by millions every day. Sweet Chilli Bacon Wrapped Chicken is something that I've loved my entire life. They are fine and they look wonderful.

To begin with this particular recipe, we must prepare a few ingredients. You can have sweet chilli bacon wrapped chicken using 6 ingredients and 13 steps. Here is how you can achieve it.

The ingredients needed to make Sweet Chilli Bacon Wrapped Chicken:

  1. {Prepare 3 tbsp of Mild Sweet Chilli Sauce.
  2. {Make ready 1 tsp of Mayonnaise.
  3. {Get 6 of Chicken Breasts.
  4. {Take 300 grams of Streaky Bacon.
  5. {Prepare 300 grams of Mozzarella Cheese.
  6. {Take 6 of Peppadews®.

Steps to make Sweet Chilli Bacon Wrapped Chicken:

  1. Mix the Mild Sweet Chilli sauce and the Mayonnaise in a cup.
  2. Preheat oven to 350° Farenheit (180° Celsius).
  3. Cut the Mozzarella Cheese into small rectangles.
  4. Put some sauce on the inside of the chicken breasts.
  5. Cut the chicken meat off the bones.
  6. Cut the Peppadews® (1 for each breast) and place them in the middle of the breast.
  7. Place the Mozzarella Cheese in the breasts as well, keeping in mind that the breasts must close up.
  8. Wrap each breast with bacon, using toothpicks to keep it in place.
  9. Spray an oven pan with non-stick spray.
  10. Place each breast on the pan.
  11. Put a bit of sauce on top of each breast.
  12. Place a generous piece of Mozzarella Cheese on top of each breast.
  13. Bake for 30 - 35 minutes.

So that is going to wrap it up for this special food sweet chilli bacon wrapped chicken recipe. Thanks so much for reading. I'm confident that you can make this at home. There's gonna be more interesting food in home recipes coming up. Remember to save this page in your browser, and share it to your family, colleague and friends. Thank you for reading. Go on get cooking!

Recipe of Perfect Wakame & Salmon Takikomi Gohan

Recipe of Perfect Wakame & Salmon Takikomi Gohan

Wakame & Salmon Takikomi Gohan.

Wakame & Salmon Takikomi Gohan

Hello everybody, I hope you are having an incredible day today. Today, I'm gonna show you how to prepare a distinctive dish, wakame & salmon takikomi gohan. One of my favorites food recipes. For mine, I am going to make it a bit tasty. This is gonna smell and look delicious.

Wakame & Salmon Takikomi Gohan is one of the most well liked of current trending meals in the world. It is enjoyed by millions every day. It is simple, it is fast, it tastes yummy. They're fine and they look fantastic. Wakame & Salmon Takikomi Gohan is something that I've loved my whole life.

To get started with this particular recipe, we must prepare a few components. You can cook wakame & salmon takikomi gohan using 9 ingredients and 5 steps. Here is how you can achieve it.

The ingredients needed to make Wakame & Salmon Takikomi Gohan:

  1. {Make ready 2 cups of (*180ml cup) Japanese Short Grain Rice.
  2. {Make ready 1 of Canned Red Salmon *210g.
  3. {Get 1 tablespoon of Sake (Rice Wine).
  4. {Make ready 1 of small piece Ginger *grated.
  5. {Make ready 1 tablespoon of Soy Sauce.
  6. {Take 1/4 teaspoon of Salt.
  7. {Get 2 tablespoons of Dried Chopped Wakame.
  8. {Take 1 of Spring Onion *finely chopped.
  9. {Prepare of Toasted Sesame Seeds.

Instructions to make Wakame & Salmon Takikomi Gohan:

  1. Wash Rice by stirring it thoroughly in water with your hand and drain the water. Repeat this a few more times until water flows through clear. Place it into the rice cooker’s inner pot..
  2. Drain the Canned Salmon, and add the liquid to the rice. Add Sake (Rice Wine), grated Ginger, Soy Sauce and Salt. Then add Water up to the 2-cups-marking. Gently stir..
  3. Remove unwanted large bones and skin from Salmon, break into chunky pieces, place on the rice. Sprinkle Dried Chopped Wakame over the rice. *Note: Break into smaller pieces if the Wakame pieces are large..
  4. Press ‘COOK’ button to start cooking. When the rice is cooked, let it steamed for 10 minutes. Then loosen and mix gently..
  5. Sprinkle with some finely chopped Spring Onion and Toasted Sesame Seeds..

So that's going to wrap this up with this special food wakame & salmon takikomi gohan recipe. Thanks so much for reading. I am confident that you will make this at home. There is gonna be more interesting food in home recipes coming up. Don't forget to save this page on your browser, and share it to your family, friends and colleague. Thanks again for reading. Go on get cooking!

Simple Way to Prepare Speedy Kunafarissa (Kunafa + Harissa) with QESHTA
(Thick Cream)

Simple Way to Prepare Speedy Kunafarissa (Kunafa + Harissa) with QESHTA (Thick Cream)

Kunafarissa (Kunafa + Harissa) with QESHTA (Thick Cream).

Kunafarissa (Kunafa + Harissa) with QESHTA (Thick Cream)

Hey everyone, hope you're having an incredible day today. Today, I will show you a way to make a distinctive dish, kunafarissa (kunafa + harissa) with qeshta (thick cream). It is one of my favorites. For mine, I am going to make it a little bit unique. This will be really delicious.

Kunafarissa (Kunafa + Harissa) with QESHTA (Thick Cream) is one of the most favored of recent trending meals on earth. It is simple, it is quick, it tastes yummy. It is enjoyed by millions daily. Kunafarissa (Kunafa + Harissa) with QESHTA (Thick Cream) is something which I have loved my whole life. They are fine and they look wonderful.

To begin with this recipe, we have to first prepare a few ingredients. You can have kunafarissa (kunafa + harissa) with qeshta (thick cream) using 22 ingredients and 7 steps. Here is how you cook that.

The ingredients needed to make Kunafarissa (Kunafa + Harissa) with QESHTA (Thick Cream):

  1. {Make ready of Harissa Layer.
  2. {Take 1 cup of semolina.
  3. {Take 1 cup of coconut flakes.
  4. {Take 1/2 cup of milk.
  5. {Make ready 1 cup of yogurt.
  6. {Take 1/2 cup of oil.
  7. {Make ready 1/4 cup of sugar.
  8. {Get Pinch of salt and baking soda.
  9. {Make ready 1/2 tsp of baking powder.
  10. {Prepare 1 tbsp of orange blossom water.
  11. {Get of Cheese layer.
  12. {Prepare 2 of mozzarella balls.
  13. {Get 1/2 cup of cream.
  14. {Make ready 1 tsp of orange blossom water.
  15. {Prepare of Kunafa Layer.
  16. {Make ready 1 cup of kataifi pastry.
  17. {Get 1/2 cup of melted butter.
  18. {Prepare 1 tbsp of sugar.
  19. {Prepare of Sugar syrup.
  20. {Prepare 1/2 cup of sugar.
  21. {Take 1/2 cup of water.
  22. {Get 1 tsp of orange blossom water.

Steps to make Kunafarissa (Kunafa + Harissa) with QESHTA (Thick Cream):

  1. Prepare your sugar syrup by bringing ingredients to a boil then allow to cool..
  2. In a bowl, mix all the ingredients for the Harissa layer..
  3. In a baking dish, spread a light layer of tahini then add your Harissa mix..
  4. In another bowl, shred your mozzarella, mix with thick cream than add onto Harissa mix..
  5. In another bowl, shred Kataifi pastry then add melted butter and sugar - mix then spread onto cheese layer..
  6. Bake at 180C for 30-35 minutes until browned..
  7. Add sugar syrup mix and wait to cool (or not!) and enjoy..

So that's going to wrap this up for this exceptional food kunafarissa (kunafa + harissa) with qeshta (thick cream) recipe. Thanks so much for your time. I'm sure you will make this at home. There is gonna be interesting food in home recipes coming up. Remember to bookmark this page on your browser, and share it to your loved ones, friends and colleague. Thank you for reading. Go on get cooking!

Recipe of Speedy Not your moms grilled cheese

Recipe of Speedy Not your moms grilled cheese

Not your moms grilled cheese.

Not your moms grilled cheese

Hello everybody, I hope you are having an incredible day today. Today, we're going to prepare a special dish, not your moms grilled cheese. One of my favorites food recipes. This time, I am going to make it a bit unique. This will be really delicious.

Not your moms grilled cheese is one of the most favored of recent trending foods in the world. It's simple, it's fast, it tastes delicious. It is enjoyed by millions every day. Not your moms grilled cheese is something that I've loved my whole life. They're nice and they look fantastic.

To get started with this recipe, we must prepare a few ingredients. You can have not your moms grilled cheese using 5 ingredients and 3 steps. Here is how you can achieve it.

The ingredients needed to make Not your moms grilled cheese:

  1. {Get 4 slices of Classic white bread or Rye.
  2. {Prepare of Fontina cheese.
  3. {Prepare of Sharp Cheddar Cheese 🧀.
  4. {Get of Butter.
  5. {Get of Celery salt.

Instructions to make Not your moms grilled cheese:

  1. Spread the outside of the bread with butter.
  2. Add a slice of each cheese. (Fontina doesn't usually come sliced, so you might have to shred or slice it.).
  3. Very lightly top with celery salt. (If your heavy handed, it will be too salty.) And I love salt!.

So that is going to wrap it up for this special food not your moms grilled cheese recipe. Thank you very much for reading. I'm sure you can make this at home. There is gonna be interesting food at home recipes coming up. Don't forget to bookmark this page in your browser, and share it to your loved ones, friends and colleague. Thank you for reading. Go on get cooking!

Recipe of Award-winning Murg Zafrani

Recipe of Award-winning Murg Zafrani

Murg Zafrani.

Murg Zafrani

Hey everyone, it is Drew, welcome to our recipe site. Today, I'm gonna show you how to prepare a special dish, murg zafrani. One of my favorites. This time, I'm gonna make it a bit tasty. This will be really delicious.

Murg Zafrani is one of the most popular of recent trending meals on earth. It's easy, it's quick, it tastes delicious. It is appreciated by millions every day. They're fine and they look fantastic. Murg Zafrani is something which I have loved my whole life.

To begin with this particular recipe, we have to prepare a few components. You can cook murg zafrani using 15 ingredients and 9 steps. Here is how you can achieve that.

The ingredients needed to make Murg Zafrani:

  1. {Make ready 850 grams of Chicken.
  2. {Prepare 100 grams of Ghee.
  3. {Get 5 grams of Whole Garam Masala.
  4. {Take 200 grams of Boiled Onion Paste.
  5. {Prepare 15 grams of Ginger Paste.
  6. {Make ready 15 grams of garlic paste.
  7. {Make ready 200 grams of yoghurt.
  8. {Prepare 1 1/4 tbsp of salt.
  9. {Prepare 100 grams of cashew paste.
  10. {Take 2 grams of mace powder.
  11. {Get 3 grams of green cardamom power.
  12. {Get 1 grams of saffron.
  13. {Take 30 ml of milk.
  14. {Make ready 2 large of eggs.
  15. {Take 10 grams of coriander.

Steps to make Murg Zafrani:

  1. Heat ghee in a Pan. Add whole Garam Masala and saute over medium heat until it begins to crackle..
  2. Now add onion Paste and fry for 4 to 5 min..
  3. Add ginger Paste, garlic paste and green chilli stir for a minute..
  4. Now, add the Beaten Yoghurt and salt, stir. Add the cashewnut paste and stir until the clarified fat appears on the surface..
  5. Now, add the chicken, bring to boil, add 180 ml of water? Bring to a boil again, then simmer, stirring constantly, until cooked and clarified fat appears on the surface..
  6. Sprinkle mace and cardamom power, stir, add saffron and simmer for another minute..
  7. Adjust the seasoning..
  8. TO SERVE.
  9. TO SERVE , Transfer to a serving bowl and garnish with eggs? Coriander and varq. Serve accompanied with Naan..

So that's going to wrap this up for this special food murg zafrani recipe. Thanks so much for reading. I'm sure that you will make this at home. There is gonna be more interesting food in home recipes coming up. Don't forget to save this page on your browser, and share it to your family, colleague and friends. Thanks again for reading. Go on get cooking!

Recipe of Any-night-of-the-week Yellow peas curry

Recipe of Any-night-of-the-week Yellow peas curry

Yellow peas curry.

Yellow peas curry

Hey everyone, it's me, Dave, welcome to our recipe page. Today, we're going to make a distinctive dish, yellow peas curry. It is one of my favorites. For mine, I am going to make it a bit unique. This is gonna smell and look delicious.

Yellow peas curry is one of the most favored of current trending meals in the world. It's simple, it is quick, it tastes delicious. It is enjoyed by millions every day. Yellow peas curry is something that I have loved my whole life. They are nice and they look fantastic.

To get started with this recipe, we must prepare a few components. You can have yellow peas curry using 13 ingredients and 7 steps. Here is how you cook it.

The ingredients needed to make Yellow peas curry:

  1. {Get 1 cup of yellow peas soaked and boiled.
  2. {Take 1 tsp of ginger paste.
  3. {Get 1 of onion chopped and grinded.
  4. {Take 1 of tomato pureed.
  5. {Take 4-5 cloves of garlic chopped.
  6. {Make ready 1 tsp of red chilli Powder.
  7. {Take 1/2 tsp of turmeric powder.
  8. {Take 1 tsp of cumin seed.
  9. {Prepare 2 of red chilli whole.
  10. {Prepare 1 of bay leaf.
  11. {Prepare To taste of salt and sugar.
  12. {Make ready As needed of oil.
  13. {Make ready 1/2 tsp of chole masala powder.

Instructions to make Yellow peas curry:

  1. Heat oil and temper cumin seed bay leaf and red chilli.
  2. Add onion and garlic saute well adding salt and turmeric powder.
  3. Add ginger paste and saute well.
  4. Add tomato and red chilli Powder and mix well.
  5. Now add chole masala and boiled peas and keep mixing.
  6. Add sugar and water and boil.
  7. Serve it hot with plain chapati or paratha.

So that's going to wrap this up with this exceptional food yellow peas curry recipe. Thank you very much for reading. I am sure that you will make this at home. There is gonna be more interesting food in home recipes coming up. Remember to bookmark this page in your browser, and share it to your loved ones, colleague and friends. Thank you for reading. Go on get cooking!

Steps to Make Quick Grilled Balsamic Ginger Salmon

Steps to Make Quick Grilled Balsamic Ginger Salmon

Grilled Balsamic Ginger Salmon.

Grilled Balsamic Ginger Salmon

Hey everyone, hope you are having an incredible day today. Today, I will show you a way to prepare a distinctive dish, grilled balsamic ginger salmon. One of my favorites food recipes. This time, I am going to make it a little bit tasty. This is gonna smell and look delicious.

Grilled Balsamic Ginger Salmon is one of the most popular of recent trending meals on earth. It is enjoyed by millions every day. It is simple, it's fast, it tastes delicious. Grilled Balsamic Ginger Salmon is something that I've loved my whole life. They are nice and they look wonderful.

To get started with this particular recipe, we have to prepare a few ingredients. You can cook grilled balsamic ginger salmon using 10 ingredients and 4 steps. Here is how you can achieve that.

The ingredients needed to make Grilled Balsamic Ginger Salmon:

  1. {Take 1 of Salmon Fillet.
  2. {Make ready 1/4 Cup of Balsamic Vinegar.
  3. {Take 1/3 Can of Ginger Ale.
  4. {Get 2 Cloves of Garlic.
  5. {Make ready 3 Tbs of Honey.
  6. {Take of Ginger.
  7. {Take Pinch of Oregano.
  8. {Make ready of Salt.
  9. {Get of Parsley.
  10. {Get of Lemon.

Steps to make Grilled Balsamic Ginger Salmon:

  1. Lightly salt salmon. Allow to sit for 10 minutes. Pat moisture off of salmon with a paper towel. Cut ginger and garlic as pictured below. Add to a pot along with oregano, balsamic vinegar, honey and ginger ale..
  2. Start reducing the balsamic mixture immediately by about half..
  3. Place salmon on the grill, skin side down. Apply balsamic glaze to salmon. Allow to cook until skin becomes crispy. Flip. Apply glaze to opposite side. Cook until internal temp is about 145 F..
  4. Plate and serve. Simple as that..

So that is going to wrap it up with this special food grilled balsamic ginger salmon recipe. Thank you very much for reading. I'm sure you will make this at home. There is gonna be interesting food at home recipes coming up. Don't forget to bookmark this page on your browser, and share it to your loved ones, friends and colleague. Thanks again for reading. Go on get cooking!

How to Prepare Any-night-of-the-week Lime Splash

How to Prepare Any-night-of-the-week Lime Splash

Lime Splash.

Lime Splash

Hey everyone, it's Jim, welcome to our recipe site. Today, we're going to make a distinctive dish, lime splash. One of my favorites food recipes. For mine, I'm gonna make it a little bit tasty. This is gonna smell and look delicious.

Lime Splash is one of the most well liked of current trending foods on earth. It's appreciated by millions every day. It is simple, it's fast, it tastes yummy. Lime Splash is something that I've loved my whole life. They are nice and they look wonderful.

To begin with this particular recipe, we have to first prepare a few ingredients. You can have lime splash using 5 ingredients and 6 steps. Here is how you cook it.

The ingredients needed to make Lime Splash:

  1. {Make ready 2 of Lime.
  2. {Get 1/2 cup of Sugar.
  3. {Take of Sunset lemon good colour ( you can use any other colour availabl.
  4. {Get of Brandy or Champari (optional).
  5. {Prepare of Sprite, team or any other lime fizzle drink.

Instructions to make Lime Splash:

  1. Cut the zest part of the line add into pot of 750ml boiling water, add the sugar stir and allow to boil on low heat to make the lime syrup.
  2. Once it cools down, squeeze in the lime juice from the lime,.
  3. Pour syrup into a glass, about a quarter, add some brandy or Champari, add the lime colour or which ever you have, mix everything together.. (if you are making for kids, you can skip the by alcoholic drink).
  4. Fill the glass with fizzle drink,(I used Sprite in mine).
  5. Cut in some cucumber and lemons...throw in some ice cubes and enjoy!!.
  6. .

So that is going to wrap this up for this exceptional food lime splash recipe. Thank you very much for reading. I'm sure you can make this at home. There's gonna be more interesting food at home recipes coming up. Remember to save this page in your browser, and share it to your family, friends and colleague. Thank you for reading. Go on get cooking!

How to Prepare Speedy Simple harees arabic dish

How to Prepare Speedy Simple harees arabic dish

Simple harees arabic dish.

Simple harees arabic dish

Hey everyone, it is me, Dave, welcome to our recipe site. Today, I'm gonna show you how to prepare a distinctive dish, simple harees arabic dish. It is one of my favorites. For mine, I will make it a bit unique. This is gonna smell and look delicious.

Simple harees arabic dish is one of the most well liked of current trending foods on earth. It's appreciated by millions every day. It is simple, it's fast, it tastes yummy. They are fine and they look fantastic. Simple harees arabic dish is something which I've loved my entire life.

To begin with this particular recipe, we have to prepare a few ingredients. You can have simple harees arabic dish using 6 ingredients and 8 steps. Here is how you can achieve it.

The ingredients needed to make Simple harees arabic dish:

  1. {Get half of kg gehun.
  2. {Prepare half of kg jou.
  3. {Prepare 1-2 tbls of ginger garlic paste.
  4. {Make ready 1 kg of beef with bones.
  5. {Get of salt as a taste.
  6. {Get 1-2 tbls of olive oil.

Steps to make Simple harees arabic dish:

  1. Gehun jou ko full of night soak keralin ya 3-4 hour.
  2. After an hour or night do boil but dont drain soak water ussi main banain add beef also and all ingredients.
  3. Approxly 3 hour to cooking.
  4. When all is done let it to cool.
  5. After blending like ky thora gehun nazar eye.
  6. Jub sub belnd kerlain thora water add kerke blend karain.
  7. Chahin toh simple kahain chat masala dal kar ya oil ya ghe main onion brown kerke red chilli powder turmeric powder chat masala coriandereave min leave ko ache saa cook kerke harees add karain buhat yummy banta hai☺️.
  8. Arabic people eat simple no add masala jus add olive oil or pure ghe ka tarka😃 specially in Ramdan kareem😊.

So that's going to wrap it up with this exceptional food simple harees arabic dish recipe. Thanks so much for your time. I'm confident you can make this at home. There's gonna be more interesting food in home recipes coming up. Remember to save this page on your browser, and share it to your loved ones, friends and colleague. Thanks again for reading. Go on get cooking!

How to Make Ultimate Angel cake

How to Make Ultimate Angel cake

Angel cake.

Angel cake

Hey everyone, hope you are having an amazing day today. Today, I will show you a way to prepare a distinctive dish, angel cake. One of my favorites. This time, I'm gonna make it a bit tasty. This is gonna smell and look delicious.

Angel cake is one of the most favored of recent trending meals in the world. It's appreciated by millions every day. It's easy, it's quick, it tastes delicious. Angel cake is something which I've loved my whole life. They're fine and they look fantastic.

To begin with this recipe, we have to first prepare a few ingredients. You can cook angel cake using 3 ingredients and 4 steps. Here is how you cook that.

The ingredients needed to make Angel cake:

  1. {Make ready 1 cup of plain flour, 1.1/2 cup sugar, 1.1/4 cup (9) egg whites,.
  2. {Prepare 1.1 of /2 tea spoons cream of tartar,1/4 t spoon salt,.
  3. {Make ready 1.1 of /2 t spoon vanilla, 1/2 t spoon almond extract.

Instructions to make Angel cake:

  1. .
  2. Oven 170C. In a bawl beat egg whites with cream of tartar, salt in medium speed, add vanilla almond add the rest of ingredients and slowly add the sugar. Sift flour over the egg whites gently fold the flour. Gently spoon the mixture in a 10" pan and with a knife do circles so doesn't have air in the mixture, level the top and bake 35-40'.
  3. When you take it from the oven, let it cool 2 hours,.
  4. Beat 600ml thickening cream with 3-5 tablespoons of caster sugar, add 1/2 cup if mushed strawberries to the cream, cut the cake in two spread some of the cream place the 2nd piece and cover the cake all over cut in half strawberries and place them in top and some of the mushed strawberries. Effie xx.

So that is going to wrap it up with this exceptional food angel cake recipe. Thank you very much for reading. I am sure that you will make this at home. There is gonna be interesting food in home recipes coming up. Remember to save this page in your browser, and share it to your family, friends and colleague. Thank you for reading. Go on get cooking!

How to Make Award-winning Yam Cake | Taro Cake | 芋頭糕

How to Make Award-winning Yam Cake | Taro Cake | 芋頭糕

Yam Cake | Taro Cake | 芋頭糕.

Yam Cake | Taro Cake | 芋頭糕

Hey everyone, it's Louise, welcome to my recipe site. Today, we're going to prepare a distinctive dish, yam cake | taro cake | 芋頭糕. One of my favorites food recipes. This time, I'm gonna make it a little bit unique. This is gonna smell and look delicious.

Yam Cake

To get started with this particular recipe, we must prepare a few ingredients. You can have yam cake | taro cake | 芋頭糕 using 16 ingredients and 10 steps. Here is how you can achieve that.

The ingredients needed to make Yam Cake | Taro Cake | 芋頭糕:

  1. {Prepare 50 g of Dried Shrimp,.
  2. {Prepare 8 of Dried Chinese Black Mushroom,.
  3. {Take 50 g of Dried Scallops,.
  4. {Get 100 ml of Canola / Vegetable / Peanut Oil, For Frying About.
  5. {Get 1 of Red Onion Finely Sliced Into Rings,.
  6. {Take 500 g of Yam / Taro Peeled Finely Diced,.
  7. {Make ready of Chinese 5 Spice, 1 TSP.
  8. {Get Pinch of Sea Salt,.
  9. {Get Pinch of White Pepper,.
  10. {Prepare 1 TBSP of Light Soy Sauce,.
  11. {Take 3 Cloves of Garlic Finely Minced,.
  12. {Get 200 g of Rice Flour,.
  13. {Get 1/2 TBSP of Sriracha,.
  14. {Take 1 TBSP of Kecap Manis,.
  15. {Take 1 Handful of Scallions / Green Onions Finely Sliced,.
  16. {Prepare 1 Handful of Red Chili Deseeded Finely Sliced,.

Instructions to make Yam Cake | Taro Cake | 芋頭糕:

  1. Divide the water equally into 2 separate bowls. Soak dried shrimps and mushrooms in the water for at last 30 mins. Prepare a steamer. Transfer the dried scallops into a heat proof bowl..
  2. Steam for at least 15 to 20 mins or until the scallops are fork tender. Remove from heat and set aside to cool down. Remove the dried shrimps and mushrooms from water. *Do not discard the water as it is needed at a later stage.*.
  3. Finely chop the dried shrimps and set aside. Finely dice the mushrooms and set aside. Once the scallops are cooled, tear the scallops into shreds using your hands and set aside. In a cast iron skillet over medium heat, add the oil..
  4. To check if the temperature of the oil is ready, place a wooden chopstick into the oil. If bubbles start to form, the temperature is ready for frying.* Add in the onion rings. As soon as the onion rings start to turn golden brown, remove from heat and transfer to a plate lined with kitchen paper and set aside..
  5. Add the yam into the same skillet (with the remaining oil). Saute until the yam starts to soften. Remove from heat and transfer into a large mixing bowl. Season with Chinese 5 spice, salt and pepper..
  6. Still using the same skillet with the remaining oil, add in the dried shrimps, mushrooms and scallops. Stir to combine well. Add in light soy sauce and garlic. Saute until aromatic..
  7. Transfer into the bowl together with the yam. Add in half of the fried onions. Mix to combine well. Add the water stock (from soaking the dried shrimps and mushrooms) into a pot over a medium heat..
  8. Gradually, sieve in the rice flour while whisking to combine. Stir to combine well and cook until the batter thickens. Add in the yam mixture. Stir to combine well..
  9. Lightly grease the cake pan with oil. Transfer the mixture into the cake pan. Prepare a steamer. Steam for at least 45 mins or until a skewer comes out clean..
  10. Remove from heat and allow it to cool down completely before slicing and serving, at least 1 hr. Mix sriracha with kecap manis in a small dipping saucer. Serve with scallions, red chili, the remaining fried onion and the sriracha dipping sauce..

So that's going to wrap this up for this exceptional food yam cake | taro cake | 芋頭糕 recipe. Thanks so much for your time. I am sure you can make this at home. There's gonna be more interesting food at home recipes coming up. Remember to bookmark this page in your browser, and share it to your loved ones, colleague and friends. Thanks again for reading. Go on get cooking!

How to Make Quick Fig and goat cheese salad

How to Make Quick Fig and goat cheese salad

Fig and goat cheese salad.

Fig and goat cheese salad

Hello everybody, it is Jim, welcome to my recipe site. Today, I'm gonna show you how to prepare a distinctive dish, fig and goat cheese salad. One of my favorites. This time, I am going to make it a little bit unique. This is gonna smell and look delicious.

Fig and goat cheese salad is one of the most favored of recent trending meals on earth. It is appreciated by millions daily. It's easy, it's fast, it tastes yummy. Fig and goat cheese salad is something that I have loved my whole life. They're nice and they look fantastic.

To get started with this recipe, we must prepare a few ingredients. You can have fig and goat cheese salad using 8 ingredients and 4 steps. Here is how you cook that.

The ingredients needed to make Fig and goat cheese salad:

  1. {Make ready 2/3 of Pecans.
  2. {Take 3 oz of Goat cheese.
  3. {Prepare 2 tbsp of Olive oil.
  4. {Take 8 of Figs (prefer brown).
  5. {Get 1 dash of salt and pepper.
  6. {Prepare 2 tbsp of White Balsamic vinegar or White wine vinegar.
  7. {Get 1 packages of Arugula.
  8. {Prepare 1/4 of Red onion sliced thin.

Steps to make Fig and goat cheese salad:

  1. Toast pecans. Heat oven at 350 and roast for 7-8 mins. Check occasionally to ensure they aren't getting burned. When they are done, remove from the baking dish and set aside..
  2. Slice figs either in half or quarters, set aside. Slice onions thinly..
  3. Put arugula in bowl, add balsamic vinegar, olive oil and salt and pepper. Stir gently..
  4. Add figs, onions, pecans, and goat cheese. Break up goat cheese in small bite size portions. Stir salad gently and serve!.

So that is going to wrap this up for this special food fig and goat cheese salad recipe. Thanks so much for reading. I am confident that you will make this at home. There is gonna be interesting food at home recipes coming up. Don't forget to bookmark this page on your browser, and share it to your loved ones, colleague and friends. Thank you for reading. Go on get cooking!

Simple Way to Prepare Any-night-of-the-week ‘Nikomi’ Simmered Udon &
Egg Soup

Simple Way to Prepare Any-night-of-the-week ‘Nikomi’ Simmered Udon & Egg Soup

‘Nikomi’ Simmered Udon & Egg Soup.

‘Nikomi’ Simmered Udon & Egg Soup

Hello everybody, it is Brad, welcome to our recipe page. Today, I'm gonna show you how to make a special dish, ‘nikomi’ simmered udon & egg soup. It is one of my favorites food recipes. This time, I am going to make it a little bit tasty. This will be really delicious.

‘Nikomi’ Simmered Udon & Egg Soup is one of the most well liked of current trending meals in the world. It's enjoyed by millions every day. It is easy, it is quick, it tastes delicious. ‘Nikomi’ Simmered Udon & Egg Soup is something that I have loved my entire life. They're nice and they look fantastic.

To get started with this recipe, we have to first prepare a few ingredients. You can have ‘nikomi’ simmered udon & egg soup using 10 ingredients and 5 steps. Here is how you cook it.

The ingredients needed to make ‘Nikomi’ Simmered Udon & Egg Soup:

  1. {Make ready 300 ml of Dashi Stock *OR 300ml Water & 1/2 teaspoon Dashi Powder.
  2. {Take 1 tablespoons of Sake (Rice Wine).
  3. {Get 1/4 teaspoon of Salt.
  4. {Take 2 teaspoons of Soy Sauce.
  5. {Prepare 1 teaspoon of Mirin.
  6. {Take 1 of serving Cooked Udon Noodles.
  7. {Get 1/2 of tablespoonful Dried Cut Wakame *optional.
  8. {Take 1 of Spring Onion *finely chopped.
  9. {Get 1 teaspoon of Potato Starch Flour *mixed with 2 teaspoons Water.
  10. {Get 1 of Egg *lightly whisked.

Steps to make ‘Nikomi’ Simmered Udon & Egg Soup:

  1. Heat Dashi Stock and Sake (Rice Wine) in a large saucepan or pot, season with Salt, Soy Sauce and Mirin..
  2. Add Cooked Udon Noodles and Dried Cut Wakame, and cook until Udon Noodles are soft, OR absolutely soft. *Note: As you cook longer, you have less soup as the noodles suck up the soup..
  3. Add finely chopped Spring Onion, add Potato Starch mixture, and stir. When the soup is thickened, add Egg, and stir until Egg is softly cooked..
  4. Note: When you cook the noodles absolutely soft, you don’t have much soup and you don’t need to add Potato Starch at all..
  5. Tips: A small amount of grated Ginger is a good addition..

So that's going to wrap this up with this exceptional food ‘nikomi’ simmered udon & egg soup recipe. Thanks so much for reading. I'm confident you will make this at home. There is gonna be more interesting food at home recipes coming up. Don't forget to bookmark this page in your browser, and share it to your loved ones, colleague and friends. Thanks again for reading. Go on get cooking!

Easiest Way to Prepare Quick Fizzy minty drink #nofire

Easiest Way to Prepare Quick Fizzy minty drink #nofire

Fizzy minty drink #nofire.

Fizzy minty drink #nofire

Hello everybody, it is Jim, welcome to our recipe page. Today, we're going to prepare a special dish, fizzy minty drink #nofire. One of my favorites food recipes. For mine, I'm gonna make it a little bit unique. This is gonna smell and look delicious.

Fizzy minty drink #nofire is one of the most popular of recent trending meals in the world. It is simple, it's quick, it tastes delicious. It is enjoyed by millions every day. Fizzy minty drink #nofire is something that I have loved my whole life. They're fine and they look fantastic.

To begin with this particular recipe, we have to first prepare a few ingredients. You can cook fizzy minty drink #nofire using 5 ingredients and 4 steps. Here is how you cook it.

The ingredients needed to make Fizzy minty drink #nofire:

  1. {Make ready 1 glass of full of any white fizzy drink like 7 up or Sprite.
  2. {Prepare 2 tsp of lemon juice.
  3. {Prepare leaves of Few mint.
  4. {Prepare of Crushed ice.
  5. {Prepare 1 glass of chilled water.

Instructions to make Fizzy minty drink #nofire:

  1. First make lemonade by mixing lemon juice with water...
  2. In serving glass add half glass fizzy drink then add few mint leaves, fill it with lemonade & mix well..
  3. Add crushed ice & serve in glasses chilled....
  4. Enjoy cold with crushed ice...

So that is going to wrap it up with this exceptional food fizzy minty drink #nofire recipe. Thanks so much for reading. I'm confident that you will make this at home. There is gonna be interesting food in home recipes coming up. Don't forget to save this page on your browser, and share it to your loved ones, colleague and friends. Thanks again for reading. Go on get cooking!

Steps to Prepare Super Quick Homemade Easter Egg Tempura Don

Steps to Prepare Super Quick Homemade Easter Egg Tempura Don

Easter Egg Tempura Don.

Easter Egg Tempura Don

Hello everybody, it's Brad, welcome to our recipe page. Today, I'm gonna show you how to make a special dish, easter egg tempura don. One of my favorites food recipes. This time, I will make it a little bit tasty. This is gonna smell and look delicious.

Easter Egg Tempura Don is one of the most well liked of current trending meals on earth. It's simple, it is quick, it tastes delicious. It's appreciated by millions daily. Easter Egg Tempura Don is something that I've loved my whole life. They are fine and they look fantastic.

To begin with this recipe, we have to prepare a few ingredients. You can cook easter egg tempura don using 26 ingredients and 15 steps. Here is how you cook that.

The ingredients needed to make Easter Egg Tempura Don:

  1. {Take of Egg Tempura.
  2. {Make ready 2 of 24-hour frozen eggs.
  3. {Take 1 of egg.
  4. {Take 1 pack of tempura mix.
  5. {Make ready 1 cup of cold water.
  6. {Get 1/4 cup of soda.
  7. {Prepare of flour.
  8. {Take of panko breadcrumbs.
  9. {Get of Side Dish.
  10. {Get 1 head of broccoli, stem removed.
  11. {Take 1 head of cauliflower, stem removed.
  12. {Make ready 1 of whole carrots chopped.
  13. {Get leaf of cabbage.
  14. {Take of roasted sesame seeds.
  15. {Prepare of Lemon Ginger Sauce.
  16. {Make ready 4 tbsp of lemon juice.
  17. {Take 2 cups of chicken broth.
  18. {Take 1 tsp of ginger, chopped.
  19. {Take 5 cloves of garlic, minced.
  20. {Take 2 leaves of oregano, chopped.
  21. {Make ready 3 tbsp of soy sauce.
  22. {Get 2 tbsp of mirin.
  23. {Take 2 tbsp of sesame oil.
  24. {Make ready 2 tbsp of cornstarch, dissolved in water.
  25. {Make ready of olive oil.
  26. {Get of Rice.

Instructions to make Easter Egg Tempura Don:

  1. Mix an egg with cold water and soda..
  2. Pour the egg mixture to the premixed tempura flour..
  3. Remove the shell of the frozen eggs..
  4. Roll the frozen eggs on a plate of flour, then to the tempura batter and finally to the panko bread crumbs..
  5. Immediately deepfry the eggs into a preheated pan..
  6. As for the side dishes, separate the broccoli and cauliflower heads..
  7. Blanche the vegetables into a boiling water for 30 seconds..
  8. Transfer to the vegetables into ice cold water..
  9. Transfer them.to a strainer to dry..
  10. To make cauliflower bunnies, cut the leaf veins of cabbage to shape like bunny ears and insert then on the cauliflowers..
  11. Add roasted sesame sees to serves as eyes..
  12. Sautee ginger and garlic on a preheated olive oil..
  13. Add the lemon juice, sesame oil, soy sauce, chicken broth, oregano and mirin..
  14. Once the sauce started to boil, add the cornstarch and wait until it thickens..
  15. Assemble the dish onto a bowl of rice..

So that's going to wrap it up for this special food easter egg tempura don recipe. Thank you very much for reading. I am sure you will make this at home. There is gonna be more interesting food in home recipes coming up. Don't forget to save this page on your browser, and share it to your family, colleague and friends. Thank you for reading. Go on get cooking!

Recipe of Ultimate Peanut curry chicken

Recipe of Ultimate Peanut curry chicken

Peanut curry chicken.

Peanut curry chicken

Hey everyone, I hope you're having an incredible day today. Today, I will show you a way to make a special dish, peanut curry chicken. One of my favorites. This time, I will make it a bit tasty. This is gonna smell and look delicious.

Peanut curry chicken is one of the most favored of recent trending foods in the world. It is appreciated by millions daily. It's easy, it is fast, it tastes yummy. They are fine and they look fantastic. Peanut curry chicken is something that I have loved my whole life.

To begin with this recipe, we have to prepare a few ingredients. You can cook peanut curry chicken using 16 ingredients and 14 steps. Here is how you can achieve that.

The ingredients needed to make Peanut curry chicken:

  1. {Take of Salt.
  2. {Prepare 1 tbsp of ground coriander.
  3. {Prepare 1 tbsp of paprika.
  4. {Take 1 tbsp of ground cumin.
  5. {Take 1 of tspn cayene.
  6. {Make ready 1 tbsp of turmeric.
  7. {Take of Boneless skinless chicken thighs cut into fairly large chunks.
  8. {Prepare 1/2 cup of vegetable oil.
  9. {Make ready 1 of large onion chopped.
  10. {Make ready 1 tbspn of minced garlic.
  11. {Get 1 tsp of minced ginger.
  12. {Prepare 3 cups of chicken broth.
  13. {Get 4 tbsp of ketchup or tomato paste.
  14. {Make ready 3/4 cup of smooth sweetened natural peanut butter.
  15. {Get of Vegetable mix (yellow, red green peppers and others of choice).
  16. {Take 3/4 cup of roasted peanuts.

Instructions to make Peanut curry chicken:

  1. Mix all the powder spices in a bowl.use half of the mixture to coat chicken pieces(other half to be used later).
  2. Wrap and refrigerate chicken pieces for a few hour up-to overnight (you could start the recipe immediately though).
  3. Heat oil over medium heat and brown the chicken pieces evenly and set aside..
  4. Add remaining half of the powder spices and cook for a minute while stirring.
  5. Turn heat to medium and using the same pan fry the onion till its translucent. Add the ginger and garlic and cook for a minute..
  6. Add the chicken broth or water.
  7. Add the chicken pieces plus any accumulated juices.
  8. Add ketchup or tomato paste and stir.
  9. Add the peanut butter and stir.
  10. Raise heat to high till it begins to simmer. Then reduce heat and simmer for 30 minutes. Prepare your vegetable mix.
  11. Add the vegetables (after simmering for 30 minutes). Toss in roasted peanuts and stir.
  12. Continue to simmer for 30mins or until chicken is tender (use a fork to check) with occasional stirring.
  13. Adjust seasoning and thickness to your preference.
  14. Turn off heat and serve while hot with steamed rice. Garnish with coriander leaves and some roasted peanuts. Enjoy.

So that is going to wrap this up for this special food peanut curry chicken recipe. Thank you very much for your time. I'm confident you can make this at home. There's gonna be interesting food in home recipes coming up. Don't forget to save this page on your browser, and share it to your loved ones, friends and colleague. Thank you for reading. Go on get cooking!

How to Prepare Quick Pho Ga, Vietnamese Chicken Noodle Soup

How to Prepare Quick Pho Ga, Vietnamese Chicken Noodle Soup

Pho Ga, Vietnamese Chicken Noodle Soup.

Pho Ga, Vietnamese Chicken Noodle Soup

Hello everybody, I hope you are having an amazing day today. Today, we're going to prepare a special dish, pho ga, vietnamese chicken noodle soup. It is one of my favorites. This time, I'm gonna make it a little bit unique. This will be really delicious.

Pho Ga, Vietnamese Chicken Noodle Soup is one of the most popular of current trending foods on earth. It is enjoyed by millions every day. It is easy, it is quick, it tastes yummy. They are nice and they look fantastic. Pho Ga, Vietnamese Chicken Noodle Soup is something that I have loved my whole life.

To get started with this particular recipe, we must first prepare a few components. You can have pho ga, vietnamese chicken noodle soup using 27 ingredients and 21 steps. Here is how you cook that.

The ingredients needed to make Pho Ga, Vietnamese Chicken Noodle Soup:

  1. {Get of Meat.
  2. {Make ready of Chicken Thigh (On the Bone).
  3. {Take of Chicken Breast Boneless (Optional).
  4. {Prepare of Broth.
  5. {Prepare of Knotted Chicken Stock Pod.
  6. {Take of Water.
  7. {Get of TBPS Fish Sauce.
  8. {Take of TPS Sugar.
  9. {Get of TBPS Salt.
  10. {Take of Onion.
  11. {Make ready of Ginger.
  12. {Prepare of Spring Onions.
  13. {Get of Star Anise.
  14. {Prepare of Cloves.
  15. {Take of TBPS Black Pepper Corn.
  16. {Prepare of TBPS Coriander Seeds.
  17. {Get of Coriander.
  18. {Get of Noodles.
  19. {Make ready of Pho Rice Noodles.
  20. {Make ready of Garnish.
  21. {Make ready of Thai Basil.
  22. {Prepare of Lime.
  23. {Take of Bean Sprouts.
  24. {Get of Coriander.
  25. {Take of Spring Onions.
  26. {Prepare of Mint.
  27. {Get of Birds Eye Chilli.

Instructions to make Pho Ga, Vietnamese Chicken Noodle Soup:

  1. Soak in hot water for 20 - 25 mins until soft.
  2. Drain and soak in cold water after.
  3. Cook soaked noodles in a separate pot for 1 - 2 minutes once the broth is ready.
  4. Roast or Char whole onion over an open fire on a stove & set aside.
  5. Slice and smash 2 inches of ginger.
  6. Cut 2 bunches of green onions in half and smash the ends..
  7. Pan toast star anise, cloves, black peppercorns & coriander seed till it’s fragrant..
  8. Add cut ginger, spring onions & coriander into the pan to fry..
  9. Put all toasted ingredients into a soup bag and place them into a soup pot..
  10. Add water, chicken stock, fish sauce, sugar, salt..
  11. Once boiling, add chicken in for 10 - 15 minutes.
  12. Remove chicken from the broth after 10 - 15 mins. Shred meat off and set meat aside..
  13. Put bones & spare parts back into the pot to continue simmer for better broth.
  14. Taste as it goes, feel free to add more fish sauce or salt for more taste..
  15. Put bean sprouts at the bottom of a serving bowl.
  16. Put cooked noodles on top of the bean sprouts.
  17. Lay meat on top.
  18. Add broth in.
  19. Lay spring onions, Thai basil, mint & coriander on top.
  20. Squeeze a wedge of lime.
  21. On a separate condiment saucer, dice chilli up and add fish sauce.

So that's going to wrap it up for this special food pho ga, vietnamese chicken noodle soup recipe. Thank you very much for your time. I am sure that you can make this at home. There's gonna be more interesting food at home recipes coming up. Don't forget to save this page in your browser, and share it to your loved ones, friends and colleague. Thanks again for reading. Go on get cooking!

Easiest Way to Make Quick Caramel Chilli Chicken & Cashew

Easiest Way to Make Quick Caramel Chilli Chicken & Cashew

Caramel Chilli Chicken & Cashew.

Caramel Chilli Chicken & Cashew

Hey everyone, hope you are having an amazing day today. Today, I will show you a way to make a distinctive dish, caramel chilli chicken & cashew. It is one of my favorites. For mine, I am going to make it a little bit tasty. This will be really delicious.

Caramel Chilli Chicken & Cashew is one of the most favored of recent trending meals in the world. It's enjoyed by millions every day. It's simple, it is quick, it tastes delicious. Caramel Chilli Chicken & Cashew is something which I have loved my whole life. They are fine and they look wonderful.

To begin with this particular recipe, we must first prepare a few components. You can cook caramel chilli chicken & cashew using 13 ingredients and 9 steps. Here is how you cook it.

The ingredients needed to make Caramel Chilli Chicken & Cashew:

  1. {Prepare 750 g of chicken thigh fillet, 3cm pieces.
  2. {Take 1/3 cup of caster sugar.
  3. {Take 2 of small red chillies, sliced.
  4. {Make ready 2 cloves of garlic, thinly sliced.
  5. {Prepare 1 Tbsp of minced ginger.
  6. {Prepare 1 Tbsp of fish sauce.
  7. {Get 1 bunch of baby bok choy.
  8. {Take 1 head of broccoli, into small pieces.
  9. {Get 1 cup of raw unsalted cashews.
  10. {Prepare of Vegetable oil for frying.
  11. {Prepare of Rice to serve.
  12. {Prepare of Sliced green onion to serve.
  13. {Get 150 g of snow peas, halved diagonally.

Steps to make Caramel Chilli Chicken & Cashew:

  1. Prep veggies- broccoli, snow peas & baby bok choy together. Green onions in a separate bowl..
  2. Garlic and chilli together..
  3. Throw sugar and 1/4 cup water in a small saucepan. Stir over low heat for three mins to combine. Increase heat, bring to the boil (not stirring) for further 5 to 7 mins until mixture turns golden..
  4. Remove from heat and add ginger, fish sauce, chilli and garlic. Set aside..
  5. In a large pot, boil your broccoli, snow peas and bok choy for three mins..
  6. Remove, strain and refresh in cold water. Set aside..
  7. In a large non stick fry pan, firstly toast your cashews and set aside..
  8. Now to fry chicken in batches until browned and cooked through..
  9. Return all chicken to pan with caramel mixture. Add veggies and nuts. Toss to coat in sauce. Serve with rice and top with sliced green onion. Yum! Enjoy!.

So that is going to wrap this up for this exceptional food caramel chilli chicken & cashew recipe. Thanks so much for your time. I'm confident you can make this at home. There's gonna be more interesting food in home recipes coming up. Don't forget to bookmark this page in your browser, and share it to your family, friends and colleague. Thank you for reading. Go on get cooking!

Easiest Way to Prepare Award-winning Apple juice and wine pork roast

Easiest Way to Prepare Award-winning Apple juice and wine pork roast

Apple juice and wine pork roast. Supercook clearly lists the ingredients each recipe uses, so you can find the perfect recipe quickly! Oven Braised Pork Shoulder with Apple Juice The Spruce Eats. bone-in pork shoulder roast, onions, seasoning, apple juice, barbecue sauce. dry white wine, apple juice, sugar, pears, star anise, cinnamon sticks. I was impatient and didn't boil the apple juice and wine enough before adding the butter and pouring over These veggies are exceptionally delicious especially when paired with an apple and pork main dish.

Apple juice and wine pork roast I recently enjoyed a Portuguese Bairrada, a Casa de Saima with this dish which hit the spot perfectly. A succulent pork roast that has an extravagant taste made from apple juice and white wine. Add apple juice concentrate combined with other ingredients.

Hello everybody, hope you're having an incredible day today. Today, I will show you a way to prepare a distinctive dish, apple juice and wine pork roast. It is one of my favorites. This time, I'm gonna make it a bit tasty. This will be really delicious.

Supercook clearly lists the ingredients each recipe uses, so you can find the perfect recipe quickly! Oven Braised Pork Shoulder with Apple Juice The Spruce Eats. bone-in pork shoulder roast, onions, seasoning, apple juice, barbecue sauce. dry white wine, apple juice, sugar, pears, star anise, cinnamon sticks. I was impatient and didn't boil the apple juice and wine enough before adding the butter and pouring over These veggies are exceptionally delicious especially when paired with an apple and pork main dish.

Apple juice and wine pork roast is one of the most well liked of current trending meals on earth. It is appreciated by millions every day. It is simple, it is fast, it tastes yummy. Apple juice and wine pork roast is something which I have loved my entire life. They're nice and they look wonderful.

To get started with this recipe, we must first prepare a few ingredients. You can have apple juice and wine pork roast using 9 ingredients and 2 steps. Here is how you can achieve it.

The ingredients needed to make Apple juice and wine pork roast:

  1. {Take 2 cups of white wine.
  2. {Get 3 cups of apple juice.
  3. {Prepare 2 of apples sliced.
  4. {Take 2 of table spoons of vegetable spice.
  5. {Get 2 of table spoons of roasted sweet pepper a garlic spice.
  6. {Prepare of Potatoes, carrots, turnip and cabbage.
  7. {Prepare 1 of chopped onion.
  8. {Get 3 lb of pork roast.
  9. {Prepare Dash of salt and pepper.

Stand the apples around the pork, brush the pork with a little glaze and drizzle a little over the apples. Spoon off the excess fat from the tin and put the tin. Roast pork with apples and wine, all cooked under the high pressure of an Instant Pot. An original recipe for you Making the gravy: Use a stick blender to puree the apples and onions into the winey liquid in the pot.

Steps to make Apple juice and wine pork roast:

  1. Mix everything together in a slow cooker throw in pork roast and cook for 8 hours, when finished strain some of the juice for the best gravy ever.
  2. .

Pork Roast with Apples and Sweet Potatoes Roast Shoulder of Pork with Scrumpy and Apple Sauce - James Martin - Slow Cooking. Place the pork roast on top of the onion.. cup of the apple juice, the honey, vinegar, Worcestershire . kaiser buns, if desired. Cut a small, lengthwise opening through the roast and stuff it with the chopped prunes and apple. Tie roast together and. pour in the wine and water. white wine•apple juice•apples sliced•table spoons of vegetable spice•table spoons of roasted sweet pepper a garlic spice•Potatoes, carrots, turnip and cabbage•chopped onion•pork roast.

So that is going to wrap it up for this special food apple juice and wine pork roast recipe. Thank you very much for your time. I am sure you can make this at home. There's gonna be interesting food in home recipes coming up. Don't forget to bookmark this page on your browser, and share it to your family, colleague and friends. Thanks again for reading. Go on get cooking!

Step-by-Step Guide to Prepare Any-night-of-the-week Chicken Enchiladas
(white sauce)

Step-by-Step Guide to Prepare Any-night-of-the-week Chicken Enchiladas (white sauce)

Chicken Enchiladas (white sauce).

Chicken Enchiladas (white sauce)

Hello everybody, it is Brad, welcome to our recipe page. Today, I will show you a way to make a distinctive dish, chicken enchiladas (white sauce). One of my favorites. This time, I am going to make it a little bit unique. This is gonna smell and look delicious.

Chicken Enchiladas (white sauce) is one of the most favored of recent trending foods in the world. It is appreciated by millions every day. It's simple, it's fast, it tastes delicious. Chicken Enchiladas (white sauce) is something which I have loved my entire life. They're nice and they look wonderful.

To get started with this recipe, we have to prepare a few ingredients. You can have chicken enchiladas (white sauce) using 8 ingredients and 9 steps. Here is how you cook that.

The ingredients needed to make Chicken Enchiladas (white sauce):

  1. {Get 4 Tbsp of Unsalted Butter.
  2. {Prepare 5 of Green Onions, diced up.
  3. {Take 3 Cloves of Garlic, minced.
  4. {Get 3 Lbs of Chicken Breast, boneless skinless, Diced.
  5. {Prepare 4 Oz of Cream Cheese, cut in chunks.
  6. {Take 24 Oz of Salsa Verde.
  7. {Get 8 of Burrito Size Tortilla Shells.
  8. {Take 2 C of Mozzarella, Shredded.

Instructions to make Chicken Enchiladas (white sauce):

  1. Preheat oven to 350°F.
  2. Heat butter in a large skillet over medium heat. Add onions and garlic to oil. Heat until softened and oil is infused with flavor..
  3. Toss diced chicken into skillet. Heat until cooked..
  4. Stir in cubed cream cheese and salsa. Simmer until sauce is smooth and well blended..
  5. In a 9 X 13 cake pan spoon some sauce into the bottom of the pan..
  6. Place one tortilla shell at the edge of the cake pan, spoon chicken and sauce into tortilla (Doesn't need to be stuffed full), roll, and push too the edge of the pan. Repeat until shells are used. Pour remaining sauce over stuffed tortillas.
  7. Bake for 20-25 minutes..
  8. Turn oven off. Remove pan from oven, sprinkle with cheese, return to oven until cheese is fully melted..
  9. Separate individual enchiladas and serve. They can be served alone or with sides. A bed of lettuce, corn chips, beans, rice, vegetables, or whatever you would like..

So that's going to wrap it up for this special food chicken enchiladas (white sauce) recipe. Thanks so much for your time. I'm confident that you will make this at home. There's gonna be more interesting food in home recipes coming up. Remember to save this page in your browser, and share it to your loved ones, friends and colleague. Thank you for reading. Go on get cooking!

Step-by-Step Guide to Prepare Speedy Chilli Chicken Tagliatelle in
Tomato and Sour Cream Sauce

Step-by-Step Guide to Prepare Speedy Chilli Chicken Tagliatelle in Tomato and Sour Cream Sauce

Chilli Chicken Tagliatelle in Tomato and Sour Cream Sauce.

Chilli Chicken Tagliatelle in Tomato and Sour Cream Sauce

Hey everyone, it's John, welcome to our recipe page. Today, we're going to make a special dish, chilli chicken tagliatelle in tomato and sour cream sauce. It is one of my favorites. This time, I am going to make it a bit tasty. This will be really delicious.

Chilli Chicken Tagliatelle in Tomato and Sour Cream Sauce is one of the most favored of current trending meals in the world. It is appreciated by millions every day. It's simple, it's quick, it tastes yummy. They are fine and they look fantastic. Chilli Chicken Tagliatelle in Tomato and Sour Cream Sauce is something which I've loved my whole life.

To get started with this recipe, we have to prepare a few ingredients. You can have chilli chicken tagliatelle in tomato and sour cream sauce using 21 ingredients and 12 steps. Here is how you cook that.

The ingredients needed to make Chilli Chicken Tagliatelle in Tomato and Sour Cream Sauce:

  1. {Make ready of Chilli Coated Chicken.
  2. {Make ready 2 of Sliced Chicken Breasts.
  3. {Make ready 1/3 tsp of Paprika.
  4. {Prepare 1/4 tsp of Red Cayenne Pepper (Chilli Powder).
  5. {Get 1 tsp of Salt.
  6. {Get 1 pinch of Ground White Pepper.
  7. {Make ready 1 tsp of Garlic Infused Olive Oil.
  8. {Get 4 slice of Streaky Bacon.
  9. {Take of Tomato and Sour Cream Sauce.
  10. {Take 1 can of Chopped Tomatoes.
  11. {Make ready 1 pinch of Ground Black Pepper.
  12. {Get 1 pinch of Salt.
  13. {Prepare 1 bunch of Chopped Coriander.
  14. {Take 1 dash of Garlic Purée.
  15. {Make ready 1 dash of Tomato Purée.
  16. {Make ready 1 dash of Chilli Purée.
  17. {Make ready 1/2 cup of Sour Cream.
  18. {Take of Pasta.
  19. {Take 150 grams of Tagliatelle.
  20. {Make ready 1 pinch of Salt.
  21. {Get 1250 ml of water.

Steps to make Chilli Chicken Tagliatelle in Tomato and Sour Cream Sauce:

  1. Start by adding the cayenne pepper, paprika, salt and white pepper to a bowl and mix to make a uniform powder..
  2. Add the garlic oil to the Chilli mix.
  3. Mix in the chicken and bacon to get an even coating then leave the bowl to one side..
  4. Bring a saucepan of water to a rolling boil, add a pinch of salt and then the pasta and cook for 8 minutes. (Test texture around 6-7 minutes, it should be soft with some springiness when done)..
  5. Add the chopped tomatoes to a medium heat saucepan and simmer..
  6. Add the Coriander, Garlic, Chilli and Tomato Purée and continue to simmer stirring occasionally. Add salt and pepper to taste..
  7. Bring a frying pan to a high heat with a dash of oil and add the Chilli Chicken mix..
  8. Fry the chicken and bacon, searing on each side before turning..
  9. Once the chicken is sealed add the sauce to the frying pan and turn the heat to medium-low. Cook until chicken is cooked through..
  10. Once the pasta has the right texture, drain the water in a colander without drying the pasta completely..
  11. Add the pasta, chicken and sauce to the same saucepan and put on a low heat..
  12. Finally, add the sour cream whilst stirring and black pepper to taste. Serve with garlic bread if you wish!.

So that is going to wrap it up for this exceptional food chilli chicken tagliatelle in tomato and sour cream sauce recipe. Thank you very much for reading. I'm confident you can make this at home. There's gonna be interesting food in home recipes coming up. Remember to bookmark this page on your browser, and share it to your loved ones, colleague and friends. Thank you for reading. Go on get cooking!

Recipe of Award-winning Hare lahsun ki chutney

Recipe of Award-winning Hare lahsun ki chutney

Hare lahsun ki chutney. Friends today we are going to learn how to prepare hare lehsun ki chutney, hare Lasun ki chatni, green garlic chilli chatni recipe in Hindi. finally, cool completely and enjoy lahsun ki chatni with roti. Garlic Chutney also known as Lehsun Ki Chutney is popularly used in Chaats, like Vada Pav, Chillas etc. A robust chutney, made by combining red chillies and garlic, this Lehsun ki Chutney is a spicy condiment that goes well with absolutely anything, be it parathas, chaat or vada pav and pakoras.

Hare lahsun ki chutney I have listed instructions on how to make tamarind paste for this chutney in the recipe below. Turn off the stove and transfer the garlic chutney into a. Lahsun ki chutney tastes extremely well with bajra ki roti/ millet bread and onions.

Hello everybody, it is John, welcome to our recipe page. Today, I will show you a way to make a special dish, hare lahsun ki chutney. One of my favorites food recipes. This time, I'm gonna make it a little bit unique. This will be really delicious.

Friends today we are going to learn how to prepare hare lehsun ki chutney, hare Lasun ki chatni, green garlic chilli chatni recipe in Hindi. finally, cool completely and enjoy lahsun ki chatni with roti. Garlic Chutney also known as Lehsun Ki Chutney is popularly used in Chaats, like Vada Pav, Chillas etc. A robust chutney, made by combining red chillies and garlic, this Lehsun ki Chutney is a spicy condiment that goes well with absolutely anything, be it parathas, chaat or vada pav and pakoras.

Hare lahsun ki chutney is one of the most well liked of recent trending meals on earth. It's enjoyed by millions daily. It's simple, it's fast, it tastes delicious. They're nice and they look wonderful. Hare lahsun ki chutney is something that I've loved my whole life.

To begin with this recipe, we have to first prepare a few ingredients. You can have hare lahsun ki chutney using 6 ingredients and 4 steps. Here is how you can achieve it.

The ingredients needed to make Hare lahsun ki chutney:

  1. {Make ready 1 bowl of finely chopped fresh green garlic.
  2. {Get 1/4 tspn of turmeric powder.
  3. {Make ready 1/2 tsp of red chilli powder.
  4. {Take 1/2 tsp of ghee.
  5. {Make ready 1/2 tsp of dry mango powder.
  6. {Prepare to taste of Salt.

Lasun Chutney (Lahsun ki Chutney) is the very spicy and fiery chutney prepared by grinding garlic, chilli powder, cumin seeds and coriander powder. This simple and easy to make chutney is very popular in India and can be used in many different ways. When used appropriately, it can simply. Garlic is briefly cooked in hot oil to bring out its aroma and temper its heat for this Rajasthani chutney.

Instructions to make Hare lahsun ki chutney:

  1. Heat ghee in a non stick pan & add all the ingredients..
  2. Cook it on medium flame for few mins..
  3. Make it cool & make paste of it..
  4. Serve it with roti, parantha or daal rice..

The bold condiment is served alongside rice or on breads like paratha and roti. Rajasthani Lasun ki Chutney is a dry chutney which is an essential for any Rajasthani Kitchen. It is a dry chutney to be served with any type of roti or paratha. The most famous Rajasthani dish 'Dal Bati Churma is incompletely without this Lahsun ki chutney. I made this chutney to go with my Moong.

So that's going to wrap this up for this exceptional food hare lahsun ki chutney recipe. Thanks so much for your time. I am confident that you will make this at home. There is gonna be interesting food in home recipes coming up. Remember to bookmark this page in your browser, and share it to your family, colleague and friends. Thank you for reading. Go on get cooking!

Simple Way to Prepare Perfect Banana Leaf wrapped pork

Simple Way to Prepare Perfect Banana Leaf wrapped pork

Banana Leaf  wrapped pork.

Banana Leaf  wrapped pork

Hello everybody, it's Brad, welcome to our recipe site. Today, I'm gonna show you how to prepare a distinctive dish, banana leaf  wrapped pork. It is one of my favorites food recipes. For mine, I'm gonna make it a little bit unique. This is gonna smell and look delicious.

Banana Leaf  wrapped pork is one of the most favored of current trending foods in the world. It is enjoyed by millions daily. It's easy, it's quick, it tastes yummy. They are fine and they look wonderful. Banana Leaf  wrapped pork is something which I have loved my entire life.

To get started with this recipe, we have to prepare a few components. You can cook banana leaf  wrapped pork using 18 ingredients and 9 steps. Here is how you cook it.

The ingredients needed to make Banana Leaf  wrapped pork:

  1. {Take of -----pork-----.
  2. {Make ready 1-3/4 pounds of ground pork.
  3. {Prepare 2 tablespoons of dehydrated onions.
  4. {Get 2 of large eggs.
  5. {Prepare 1 cup of crushed snack crackers, I used Ritz Crackers.
  6. {Get 1/3 pound of mozzarella cheese shredded.
  7. {Take 1/2 teaspoon of salt.
  8. {Make ready 1/2 teaspoon of granulated garlic powder.
  9. {Prepare 2 tablespoons of chopped parsley.
  10. {Get 1/3 pound of extra sharp cheddar cheese.
  11. {Get of --sauce---.
  12. {Prepare 1/2 cup of crushed tomatoes.
  13. {Get 1/2 teaspoon of basil.
  14. {Get 2 tablespoons of chopped parsley.
  15. {Prepare 1 tablespoon of balsamic vinegar.
  16. {Prepare 1 tablespoon of butter.
  17. {Get of ---------wrap---------.
  18. {Prepare 1 of large banana leaf.

Steps to make Banana Leaf  wrapped pork:

  1. Preheat oven 390 degrees Fahrenheit.
  2. Mix the pork, salt eggs, garlic, parsley, and Ritz Crackers together..
  3. Put pork mixture on the leaf. Flatten out half of the pork mixture on part of the banana leaf..
  4. Then add half the mozzarella and cheddar cheeses to the center of the pork. Repeat with the other half of ingredients..
  5. Enclose the pork around the cheeses..
  6. Fold covering the pork with banana leaf and tie it up..
  7. Set wrapped pork in an oven safe dish and bake in oven for 1 hour. Let rest 10 minutes.
  8. Mix all the sauce ingredients and simmer 7 minutes serve on top of pork.
  9. Serve I hope you enjoy!.

So that's going to wrap it up with this special food banana leaf  wrapped pork recipe. Thanks so much for reading. I am confident you will make this at home. There is gonna be more interesting food in home recipes coming up. Don't forget to save this page on your browser, and share it to your loved ones, colleague and friends. Thank you for reading. Go on get cooking!

Easiest Way to Make Ultimate Chef Zee's Carne Frita (Dominican fried
beef)

Easiest Way to Make Ultimate Chef Zee's Carne Frita (Dominican fried beef)

Chef Zee's Carne Frita (Dominican fried beef).

Chef Zee's Carne Frita (Dominican fried beef)

Hey everyone, hope you are having an amazing day today. Today, I'm gonna show you how to prepare a special dish, chef zee's carne frita (dominican fried beef). It is one of my favorites. This time, I am going to make it a little bit tasty. This will be really delicious.

Chef Zee's Carne Frita (Dominican fried beef) is one of the most popular of current trending meals in the world. It is enjoyed by millions daily. It's easy, it's fast, it tastes yummy. They are fine and they look wonderful. Chef Zee's Carne Frita (Dominican fried beef) is something that I have loved my entire life.

To begin with this particular recipe, we have to first prepare a few ingredients. You can cook chef zee's carne frita (dominican fried beef) using 9 ingredients and 3 steps. Here is how you can achieve that.

The ingredients needed to make Chef Zee's Carne Frita (Dominican fried beef):

  1. {Make ready 2.5 pounds of beef chunked or buy beef stew packs.
  2. {Get 1 tbs of oregano.
  3. {Take 1 of chicken bullion cube.
  4. {Make ready 8 of garlic cloves mashed.
  5. {Get 1-2 of limes.
  6. {Prepare of to taste Black pepper.
  7. {Take 2 c of water.
  8. {Take of Olive oil for quick fry.
  9. {Prepare of Canola or vegetable oil for deep frying.

Instructions to make Chef Zee's Carne Frita (Dominican fried beef):

  1. Add beef, garlic, black pepper, oregano, and limes. Mix to combine. Let marinade overnight or atleast 2hrs..
  2. On a medium-high setting add olive oil to a Dutch oven or rice pot. Add beef, stirring occasionally (beef will release juices). After 5-10 min (once browned on all sides) add water (I pour water into marinade bowl)..
  3. Boil/simmer until water is dried up & meat is tender (20-45min). In a separate pan heat up oil until it is bubbling when you splash water to it (350 degrees). Carefully add beef & fry about 15seconds on each side. Remove and let paper towel absorb excess oil. Before serving squirt a little lime juice from a lime over. Best dipped in ketchup..

So that's going to wrap it up with this special food chef zee's carne frita (dominican fried beef) recipe. Thanks so much for your time. I'm confident you will make this at home. There is gonna be more interesting food in home recipes coming up. Don't forget to bookmark this page in your browser, and share it to your loved ones, friends and colleague. Thank you for reading. Go on get cooking!

Recipe of Quick Easy Roasted Soy Flour Snowball Cookies

Recipe of Quick Easy Roasted Soy Flour Snowball Cookies

Easy Roasted Soy Flour Snowball Cookies.

Easy Roasted Soy Flour Snowball Cookies

Hello everybody, it's Jim, welcome to our recipe page. Today, I'm gonna show you how to prepare a distinctive dish, easy roasted soy flour snowball cookies. One of my favorites food recipes. For mine, I'm gonna make it a bit tasty. This is gonna smell and look delicious.

Easy Roasted Soy Flour Snowball Cookies is one of the most popular of recent trending meals in the world. It is simple, it's fast, it tastes delicious. It's enjoyed by millions daily. They're nice and they look wonderful. Easy Roasted Soy Flour Snowball Cookies is something which I have loved my whole life.

To get started with this particular recipe, we must prepare a few ingredients. You can have easy roasted soy flour snowball cookies using 5 ingredients and 5 steps. Here is how you cook it.

The ingredients needed to make Easy Roasted Soy Flour Snowball Cookies:

  1. {Get 70 grams of Cake flour.
  2. {Make ready 30 grams of Sugar.
  3. {Prepare 10 grams of Kinako.
  4. {Prepare 30 grams of Vegetable oil.
  5. {Make ready 1 of Roasted soy flour, powdered sugar (to finish).

Steps to make Easy Roasted Soy Flour Snowball Cookies:

  1. Pre-heat the oven to 170℃. Put the bowl on a scale and add all the ingredients..
  2. Mix well with a spatula..
  3. I rolled them by hand this time. Line up on a baking tray with gaps in between them, and bake for 15 minutes at 320°F/170°C..
  4. Done! If you touch them they will crumble, so wait until they have cooled down..
  5. Once they have cooled, coat in a mixture of soybean flour and sugar, as you like..

So that's going to wrap it up for this exceptional food easy roasted soy flour snowball cookies recipe. Thanks so much for reading. I am confident you will make this at home. There is gonna be more interesting food at home recipes coming up. Remember to save this page in your browser, and share it to your loved ones, friends and colleague. Thanks again for reading. Go on get cooking!

Recipe of Speedy Dorm Room Pho

Recipe of Speedy Dorm Room Pho

Dorm Room Pho.

Dorm Room Pho

Hello everybody, I hope you are having an amazing day today. Today, we're going to make a special dish, dorm room pho. It is one of my favorites. This time, I will make it a bit tasty. This will be really delicious.

Dorm Room Pho is one of the most popular of current trending foods in the world. It is simple, it is quick, it tastes delicious. It's enjoyed by millions every day. They're fine and they look fantastic. Dorm Room Pho is something that I've loved my whole life.

To get started with this particular recipe, we have to prepare a few ingredients. You can have dorm room pho using 6 ingredients and 7 steps. Here is how you cook that.

The ingredients needed to make Dorm Room Pho:

  1. {Make ready 2 packs of Ramen Noodles.
  2. {Make ready 1 of Bell Pepper any color.
  3. {Take 1/2 of Purple Onion.
  4. {Prepare 1/3 of Avocado.
  5. {Make ready of Some Andouille Sausage.
  6. {Get 2 of tbps olive oil.

Steps to make Dorm Room Pho:

  1. In a large pan Fry Sausage & remove. Pour in olive oil. And, turn heat on med high. Toast the Ramen Noodles. DO NOT break up noodles. Once toasted on both sides. Remove and place on paper towels to drain..
  2. Add Chopped veggies to oil. And, sauteed for 3-5 mins..
  3. Add Noodles back into the pan. Add 1 1/2 cup of water and Seasonings from both Noodle packets..
  4. Once the noodles has cooked down with veggies. Stir in Sausage..
  5. Place in a bowl and enjoy. Recipe may be found on my YouTube channel or Facebook page. 😇🔥.
  6. You can add any veggies that you love or egg. Your choice.
  7. Play with your food. Best advice I got 😎🙃.

So that's going to wrap this up with this exceptional food dorm room pho recipe. Thank you very much for your time. I'm sure you will make this at home. There's gonna be interesting food at home recipes coming up. Don't forget to bookmark this page on your browser, and share it to your family, colleague and friends. Thanks again for reading. Go on get cooking!

Recipe of Favorite The infamous Shrimp Linguine cheat!

Recipe of Favorite The infamous Shrimp Linguine cheat!

The infamous Shrimp Linguine cheat!.

The infamous Shrimp Linguine cheat!

Hello everybody, hope you are having an amazing day today. Today, I will show you a way to prepare a special dish, the infamous shrimp linguine cheat!. It is one of my favorites food recipes. For mine, I am going to make it a little bit unique. This will be really delicious.

The infamous Shrimp Linguine cheat! is one of the most popular of current trending foods in the world. It's easy, it's quick, it tastes delicious. It's enjoyed by millions every day. The infamous Shrimp Linguine cheat! is something which I've loved my whole life. They're fine and they look fantastic.

To begin with this particular recipe, we have to prepare a few ingredients. You can cook the infamous shrimp linguine cheat! using 12 ingredients and 7 steps. Here is how you cook that.

The ingredients needed to make The infamous Shrimp Linguine cheat!:

  1. {Make ready 16 oz of Linguine or Spaghetti (I used spaghetti).
  2. {Prepare 1 oz of Low sodium bacon bits.
  3. {Get 1 lb of Uncooked, cleaned and deveined shrimp (thawed & drained).
  4. {Take 1 can of Condensed cream of mushroom soup.
  5. {Take 12 oz of water.
  6. {Make ready 2 tsp of butter.
  7. {Get 1/2 cup of 2% milk.
  8. {Get 1/2 tsp of onion powder.
  9. {Prepare 1 tsp of garlic powder.
  10. {Get 1/2 tsp of ground black pepper.
  11. {Prepare 2 tsp of Italian Seasoning.
  12. {Take 4 oz of grated parmesan cheese.

Instructions to make The infamous Shrimp Linguine cheat!:

  1. Boil pasta in 6-8 cups of water until al dente (I like to get my pasta started right away)..
  2. On medium heat, pour soup in a large skillet or pot. Add the water and stir until smooth..
  3. Add butter and stir in a 1/2 cup of milk until well blended..
  4. Add onion powder, garlic powder, pepper and Italian seasoning..
  5. Bring sauce to a slight boil and reduce the heat to low for 5-7 minutes. This will allow the sauce to thicken. Once thickened, add the shrimp..
  6. Turn the heat just below medium. The sauce will absorb the flavor of the shrimp..
  7. Once you see the shrimp begin to turn pink, stir in the cheese and reduce the heat to low for 5-10 minutes until the sauce thickens to your preference. Serve with pasta of your choice!.

So that's going to wrap this up for this special food the infamous shrimp linguine cheat! recipe. Thank you very much for your time. I am sure that you will make this at home. There's gonna be interesting food at home recipes coming up. Don't forget to bookmark this page on your browser, and share it to your family, colleague and friends. Thank you for reading. Go on get cooking!

Recipe of Favorite Bourbon BBQ Pork Ribs (crockpot)

Recipe of Favorite Bourbon BBQ Pork Ribs (crockpot)

Bourbon BBQ Pork Ribs (crockpot).

Bourbon BBQ Pork Ribs (crockpot)

Hello everybody, hope you are having an incredible day today. Today, I'm gonna show you how to prepare a special dish, bourbon bbq pork ribs (crockpot). One of my favorites food recipes. For mine, I'm gonna make it a bit unique. This is gonna smell and look delicious.

Bourbon BBQ Pork Ribs (crockpot) is one of the most popular of recent trending meals on earth. It is enjoyed by millions every day. It's easy, it's fast, it tastes yummy. Bourbon BBQ Pork Ribs (crockpot) is something that I have loved my whole life. They're fine and they look fantastic.

To get started with this recipe, we must prepare a few components. You can have bourbon bbq pork ribs (crockpot) using 16 ingredients and 6 steps. Here is how you cook it.

The ingredients needed to make Bourbon BBQ Pork Ribs (crockpot):

  1. {Make ready 3 lb of Boneless country style pork ribs.
  2. {Take 1 of as needed Salt & pepper, for the pork.
  3. {Get 1 medium of Onion, chopped.
  4. {Make ready of bourbon BBQ sauce.
  5. {Prepare 2 cup of Ketchup.
  6. {Get 1/2 cup of Honey OR brown sugar.
  7. {Take 2 tbsp of Dark molasses.
  8. {Take 2 tbsp of Apple cider vinegar.
  9. {Prepare 2 tbsp of Spicy mustard.
  10. {Make ready 1/3 cup of Bourbon.
  11. {Prepare 2 tsp of Liquid smoke (available by the Worcestershire sauce in grocery store).
  12. {Take 1 tsp of Smoked paprika.
  13. {Make ready 1 tsp of Garlic powder.
  14. {Take 1 tsp of Onion powder.
  15. {Get 1/2 tsp of Black pepper.
  16. {Prepare 1/2 tsp of Crushed red pepper flakes.

Steps to make Bourbon BBQ Pork Ribs (crockpot):

  1. Put all BBQ sauce ingredients into a sauce pan and let cook on medium, stirring occasionally. Cook for 10-20 minutes while you prepare the pork..
  2. Season the pork ribs liberally with salt and pepper. Preheat a large skillet over medium high heat..
  3. Sear the pork in the hot pan...3-5 minutes per side, or until golden brown.
  4. Layer the pork and chopped onions in crockpot..
  5. Pour BBQ sauce over ribs..
  6. Cook on low 8-12 hours or high 6-8 hours..

So that is going to wrap this up for this exceptional food bourbon bbq pork ribs (crockpot) recipe. Thank you very much for your time. I am confident that you will make this at home. There is gonna be more interesting food in home recipes coming up. Don't forget to save this page on your browser, and share it to your loved ones, colleague and friends. Thanks again for reading. Go on get cooking!

Steps to Make Speedy Tuna Patties with Roasted Potatoes

Steps to Make Speedy Tuna Patties with Roasted Potatoes

Tuna Patties with Roasted Potatoes.

Tuna Patties with Roasted Potatoes

Hey everyone, I hope you are having an amazing day today. Today, I will show you a way to prepare a distinctive dish, tuna patties with roasted potatoes. It is one of my favorites food recipes. For mine, I will make it a bit tasty. This is gonna smell and look delicious.

Tuna Patties with Roasted Potatoes is one of the most popular of recent trending foods on earth. It's simple, it is quick, it tastes delicious. It's enjoyed by millions daily. Tuna Patties with Roasted Potatoes is something which I have loved my whole life. They are fine and they look fantastic.

To begin with this recipe, we must first prepare a few ingredients. You can cook tuna patties with roasted potatoes using 8 ingredients and 12 steps. Here is how you can achieve it.

The ingredients needed to make Tuna Patties with Roasted Potatoes:

  1. {Get 5 of large eggs.
  2. {Make ready 9 tbsp of olive oil.
  3. {Make ready 8 cans of chunk light tuna.
  4. {Get 6 tbsp of liquid egg whites.
  5. {Make ready 1/2 of seasoned Panko Bread crumbs.
  6. {Get 6 lbs of russet potatoes.
  7. {Get 2 tsp of salt.
  8. {Get 2 tsp of pepper.

Instructions to make Tuna Patties with Roasted Potatoes:

  1. Preheat oven to 400 degrees..
  2. Fill large sauce pot half way with cold water, add salt and a touch of vinegar. Bring to a boil..
  3. Wash, dry, and cube potatoes. Add to boiling water and let parboil for 5 minutes..
  4. Drain potatoes and put in a large bowl. Add salt, pepper, and 6 tbsp olive oil. Mix thoroughly with a metal spoon..
  5. Transfer potatoes to baking sheet and let bake for 45 minutes..
  6. Now for the tuna patties. In a bowl, mix eggs, tuna, egg whites, breadcrumbs, and 1 tbsp of olive oil..
  7. Add remaining olive oil to skillet and cook over a medium heat..
  8. Take tuna mixture and form into patties about the size of your palm. You can use gloves if you don't want you hands to get mushy..
  9. Take patties and place on skillet. They should make a nice sizzling sound. Cook until the underside is a soft brown, about 6 minutes, and then flip. Cook other side until also brown..
  10. If tuna patties aren't browning nicely, add a little more olive oil..
  11. Take the potatoes out of the oven. They should easily release from the baking pan..
  12. Plate and serve!.

So that is going to wrap this up for this special food tuna patties with roasted potatoes recipe. Thanks so much for reading. I'm confident you will make this at home. There's gonna be more interesting food at home recipes coming up. Remember to save this page on your browser, and share it to your family, colleague and friends. Thanks again for reading. Go on get cooking!