Easiest Way to Prepare Ultimate Mumbai Street Style Ragda Pattice

Easiest Way to Prepare Ultimate Mumbai Street Style Ragda Pattice

Mumbai Street Style Ragda Pattice.

Mumbai Street Style Ragda Pattice

Hey everyone, it's me, Dave, welcome to my recipe page. Today, I will show you a way to make a special dish, mumbai street style ragda pattice. It is one of my favorites. This time, I am going to make it a bit unique. This is gonna smell and look delicious.

Mumbai Street Style Ragda Pattice is one of the most well liked of current trending foods in the world. It is easy, it is fast, it tastes delicious. It's appreciated by millions every day. Mumbai Street Style Ragda Pattice is something that I have loved my entire life. They're fine and they look wonderful.

To get started with this recipe, we have to first prepare a few ingredients. You can cook mumbai street style ragda pattice using 23 ingredients and 19 steps. Here is how you cook it.

The ingredients needed to make Mumbai Street Style Ragda Pattice:

  1. {Make ready of Ragda.
  2. {Take 250 grams of White Peas/Safed Vatana.
  3. {Take 1/2 liter of Water to Soak.
  4. {Get 1 pinch of salt.
  5. {Take 2 tsp of Turmeric Powder.
  6. {Prepare 1/2 of Water to boil the peas.
  7. {Get of Pattice.
  8. {Prepare 500 grams of Boiled Potatoes.
  9. {Get 2 of Green Chillies.
  10. {Make ready 1 inch of Ginger.
  11. {Take 1 pinch of Salt.
  12. {Take 6 tbsp of Arrowroot/ Corn Flour/ Bread Crumbs.
  13. {Prepare 2 tsp of Dry Mango Powder.
  14. {Get 4 tbsp of Oil (to shallow fry).
  15. {Get As needed of Garlic Chutney.
  16. {Prepare As required of Mint Chutney.
  17. {Get as required of Tamrind Chutney.
  18. {Prepare of For garnishing.
  19. {Get 2 of large Onions, finely chopped.
  20. {Get 2 of large Tomatoes, finely chopped.
  21. {Make ready 1 cup of Nylon Sev.
  22. {Get as per taste of Salt & Pepper.
  23. {Take 1 cup of Coriander, finely chopped.

Steps to make Mumbai Street Style Ragda Pattice:

  1. Soak white peas in hot water for 8-10 hours..
  2. Strain the water and add peas to a pressure cooker, add 1/2 liter water, salt (as per taste), turmeric powder and keep it to boil..
  3. Boil it on medium-low flame, around 4-5 whistles. Your Ragda is ready..
  4. In a bowl add boiled potatoes and smash them..
  5. Add Ginger Chilli paste..
  6. Add salt as per taste, dry mango powder..
  7. Add arrowroot/ corn flour/ bread crumbs and mix well..
  8. Make pattice of equal size, around 2" diameter..
  9. Heat the pan on medium-low flame and add oil..
  10. Add pattice and shallow fry on both the sides..
  11. Shallow fry until golden brown..
  12. Before assembling keep your chutneys, chopped onions & tomatoes, coriander ready..
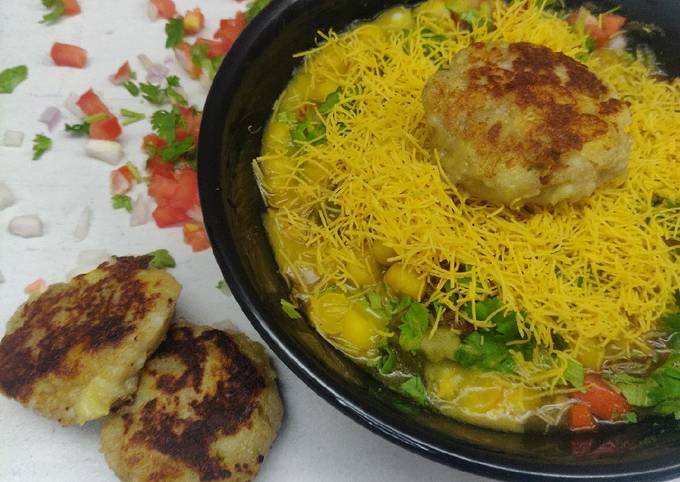
  13. To assemble, take a bowl or a plate which is not too deep. Add 1/4 cup of ragda and place your pattice (3-4 no's.).
  14. Cover your pattice with more ragda(1/4 cup).
  15. Sprinkle chopped onions & tomatoes evenly..
  16. Add mint, garlic & tamrind chutney according to your taste..
  17. Sprinkle some dry mango powder, salt & pepper..
  18. Garnish with some chopped coriander and nylon sev..
  19. Delicious Street Style Ragda Pattice is ready. Enjoy!.

So that's going to wrap this up for this exceptional food mumbai street style ragda pattice recipe. Thank you very much for reading. I am confident you will make this at home. There's gonna be interesting food in home recipes coming up. Remember to save this page on your browser, and share it to your loved ones, colleague and friends. Thank you for reading. Go on get cooking!

Steps to Prepare Speedy Hare bahre chawal

Steps to Prepare Speedy Hare bahre chawal

Hare bahre chawal. See recipes for Aloo bahre rogani phrathy, Hare bahre chawal too. अमिलो भैसकेको दहि बाट यसरि बनाउनुस मिठो कडी Ingredients for Hare Matar ke Chawal / सामग्री Procedure for Hare Matar Ke Chawal: Wash the green peas with water nicely and then trasnfer them to a mixer jar.

Hare bahre chawal Rajma Chawal: Directed by Leena Yadav. With Amyra Dastur, Rishi Kapoor, Mukesh Chhabra, Sheeba Chaddha. An internet-rookie father attempts to use social media to enhance his faltering relationship. ***** Мантра Рамы ***** rama janata ki jai śaraṇam sham hare hare oṃ jaya jaya sita ram रम जनत कि जै शरणम् स्हम् हरे हरे ॐ जय जय सित रम् РАМА ДЖАНТА КИ ДЖАЙ ШАРАНАМ ШАМ ХАРЕ ХАРЕ ОМ.

Hello everybody, it's Drew, welcome to my recipe page. Today, I'm gonna show you how to make a special dish, hare bahre chawal. It is one of my favorites. For mine, I am going to make it a bit unique. This will be really delicious.

See recipes for Aloo bahre rogani phrathy, Hare bahre chawal too. अमिलो भैसकेको दहि बाट यसरि बनाउनुस मिठो कडी Ingredients for Hare Matar ke Chawal / सामग्री Procedure for Hare Matar Ke Chawal: Wash the green peas with water nicely and then trasnfer them to a mixer jar.

Hare bahre chawal is one of the most well liked of recent trending foods on earth. It's simple, it is quick, it tastes yummy. It is enjoyed by millions every day. Hare bahre chawal is something that I've loved my whole life. They are nice and they look fantastic.

To begin with this particular recipe, we have to prepare a few ingredients. You can have hare bahre chawal using 16 ingredients and 7 steps. Here is how you cook it.

The ingredients needed to make Hare bahre chawal:

  1. {Make ready 1 kg of chawal.
  2. {Take of Adha kg shimla mirch.
  3. {Prepare of Adha kg matar.
  4. {Take 1 of and half cup laal gajar.
  5. {Make ready 1 cup of band gobi.
  6. {Get 1 cup of dahi.
  7. {Prepare Half of cup hara lasan.
  8. {Get 2 tsp of lasan adrak paste.
  9. {Make ready 1 cup of daniya.
  10. {Get 1 cup of pudina.
  11. {Take 3 tsp of chilli sauce.
  12. {Get 3 tsp of soya sauce.
  13. {Prepare 5 tsp of vinegar.
  14. {Make ready 1 tsp of kali mirch powder.
  15. {Take 1 cup of oil.
  16. {Prepare of Namak hasb e zarorat.

Kazalika, an nuna hare-hare da ƙungiyar ta yi iƙirarin cewa na baya-bayan nan ne da ta kai a Najeriya da kuma sabuwar Tsagerun Neja Delta sun yi barazanar ƙaddamar da hare-hare kan matatun fetur. How to apply for Light driving license online? (Click Hare). All this while we had been going gaga over pizzas and burgers as the Not only from the global food crisis perspective, even the health experts feel that daal-chawal is. If desired, rajma chawal can be flavored with a variety of spices such as chili peppers, cinnamon, bay leaves "Parashar Foods is a small food-joint in Connaught Place that serves flavorful Rajma Chawal.

Steps to make Hare bahre chawal:

  1. Laal gajar band gobi aur shimla mirch ko kadu kash kar lein hara lasan hara daniya bareek cut lein.
  2. Dahi main kali mirch powder add kar phent lein aur chawalon ko boil kar lein namak dal ke.
  3. Ek dagchi main oil garam kar lein phir us main lasan adrak paste aur hara lasan add kar ke halka brown hone pe us main matar dal dein 5 mins pakane ke baad dahi jis main kali mirch powder add kar ke rakha tha wo dal ke 3 mins dakan de ke low flame pe rakh dein.
  4. 3 mins baad kadu kash ki hui laal gajar add karen 2 mins ke baad band gobi kadu kash ki hui shimla mirch kadu kash kiye huay chilli sauce vinegar soya sauce aur namak add kar lein.
  5. 5 mins paka ke boil chawal add kar ke mix kar lein.
  6. Jab ache say mix ho jaye toh chawalon ke upar hara daniya aur pudina dal ke 15 mins ke liye dam pe rakh dein.
  7. Hare bahre chawal tayar hain masaledar fry fish ke sath restaurant style raita bhi😋.

Urdu Recipes of Daal Chawal, Easy Dal Rice food recipes in Urdu and English. Make easily at home with complete Step by Step instructions, and videos. Large collection of Pakistani and international. Daal Chawal Recipe - Read Quick & Easy to Cook Daal Chawal Recipe and make your favorite Try the new Daal Chawal Recipe posted online from this page. It is delicious yet tasty to give you a blend.

So that is going to wrap this up for this exceptional food hare bahre chawal recipe. Thanks so much for reading. I'm sure you will make this at home. There is gonna be more interesting food in home recipes coming up. Remember to bookmark this page in your browser, and share it to your family, friends and colleague. Thanks again for reading. Go on get cooking!

Recipe of Favorite Italian sausages and vegetable skillet with spicy
green harissa

Recipe of Favorite Italian sausages and vegetable skillet with spicy green harissa

Italian sausages and vegetable skillet with spicy green harissa. Fresh Organic Vegetarian And Vegan Dishes Are Our Specialty. Prep and cook the sausages Pat the sausages dry with a paper towel; prick in a few places with a fork, if desired. Stir in the tomatoes, season with salt and pepper, and cook until the tomatoes start to soften.

Italian sausages and vegetable skillet with spicy green harissa Heat the olive oil in a large skillet over medium-high. The sausage will not be cooked through. Place them on a cutting board, slice them, and set aside.

Hello everybody, it's Drew, welcome to my recipe site. Today, I'm gonna show you how to prepare a distinctive dish, italian sausages and vegetable skillet with spicy green harissa. One of my favorites. For mine, I am going to make it a bit tasty. This will be really delicious.

Fresh Organic Vegetarian And Vegan Dishes Are Our Specialty. Prep and cook the sausages Pat the sausages dry with a paper towel; prick in a few places with a fork, if desired. Stir in the tomatoes, season with salt and pepper, and cook until the tomatoes start to soften.

Italian sausages and vegetable skillet with spicy green harissa is one of the most popular of recent trending foods on earth. It is appreciated by millions daily. It's simple, it's quick, it tastes delicious. Italian sausages and vegetable skillet with spicy green harissa is something that I've loved my entire life. They are nice and they look wonderful.

To begin with this particular recipe, we have to first prepare a few components. You can cook italian sausages and vegetable skillet with spicy green harissa using 7 ingredients and 11 steps. Here is how you can achieve that.

The ingredients needed to make Italian sausages and vegetable skillet with spicy green harissa:

  1. {Prepare 1 of red onion.
  2. {Prepare 3 oz of shredded red or other cabbage.
  3. {Get 1 of zucchini or other summer squash.
  4. {Get of (optional) 6 oz grape or cherry tomatoes.
  5. {Take 2 of fresh mild Italian pork sausages (about 1/4 lb each).
  6. {Make ready 3 of scallions (green onions).
  7. {Make ready of Spicy green harissa, or salsa (to taste).

Add vegetable oil to a large pan and heat over medium-high heat. Add sausages and cook until browned on all sides. Remove sausage from pan and set aside (Note: You do not need to cook it through at this point.) Add onion and peppers to grease left in pan and cook over medium heat until softened. Italian Sausage and Peppers Sandwich One of the most classic ways to prepare Italian sausage in the Northeast is to sautée up some bell peppers and onions and grill the sausage until the whole mess is sizzling.

Instructions to make Italian sausages and vegetable skillet with spicy green harissa:

  1. Peel the onion and cut into ½-inch pieces..
  2. Coarsely chop the cabbage..
  3. Cut the zucchini into ½-inch pieces..
  4. Cut the tomatoes in half. I personally don't care for warm tomatoes, so I skip these..
  5. Pat the sausages dry with a paper towel; prick in a few places with a fork, if desired..
  6. In a large frying pan over medium-high heat, warm 1 to 2 teaspoons oil until hot but not smoking. Add the sausages and cook, turning once, until browned but not yet cooked through, 3 to 4 minutes per side. Transfer to a cutting board to rest. Do not clean the pan..
  7. In the same pan used for the sausages, stir in the onion, season with salt and pepper, and cook over medium heat until starting to soften, 1 to 2 minutes. Add the cabbage and zucchini and cook, stirring occasionally, until the cabbage begins to wilt and the zucchini starts to soften, 2 to 3 minutes. Stir in the tomatoes, season with salt and pepper, and cook until the tomatoes start to soften, 1 to 2 minutes. While the vegetables cook, slice the sausages and scallions..
  8. Cut the sausages on the diagonal into ½-inch-thick slices..
  9. Trim the root ends from the scallions; thinly slice the scallions for garnish..
  10. To the pan with the vegetables, stir in the sausages and cook until the sausages are cooked through, 1 to 2 minutes..
  11. Transfer the sausages and vegetables to individual bowls or plates. Garnish with the scallions and as much green harissa as you like and serve..

Pile them high on a crusty roll, and you've got a satisfying sandwich that tastes just like a carnival. Place the potatoes, squash, zucchini, carrots, onions, peppers, cauliflower sausage on the sheet pan. Drizzle olive oil all over the vegetables and sausages. Sprinkle salt, pepper, paprika, garlic powder, ginger powder, oregano, parsley, thyme, basil, red chili flakes. Toss everything together until everything is evenly coated.

So that's going to wrap this up for this special food italian sausages and vegetable skillet with spicy green harissa recipe. Thanks so much for your time. I'm confident that you will make this at home. There is gonna be interesting food in home recipes coming up. Don't forget to save this page on your browser, and share it to your loved ones, friends and colleague. Thanks again for reading. Go on get cooking!

Step-by-Step Guide to Prepare Award-winning Pancit

Step-by-Step Guide to Prepare Award-winning Pancit

Pancit.

Pancit

Hello everybody, it is Brad, welcome to my recipe page. Today, I'm gonna show you how to prepare a special dish, pancit. One of my favorites. For mine, I am going to make it a bit unique. This will be really delicious.

Pancit is one of the most well liked of current trending meals in the world. It is easy, it's quick, it tastes delicious. It's enjoyed by millions daily. They're nice and they look fantastic. Pancit is something which I have loved my whole life.

To begin with this particular recipe, we must prepare a few ingredients. You can cook pancit using 13 ingredients and 10 steps. Here is how you cook it.

The ingredients needed to make Pancit:

  1. {Take 1 package of rice noodles/rice sticks (16 0z).
  2. {Get 1 of medium onion, chopped.
  3. {Get 6 of garlic cloves, chopped (or more!).
  4. {Get 3 Tbsp of olive oil.
  5. {Make ready 1 of bay leaf.
  6. {Prepare 3/4 lb of chicken pieces (boneless, skinless, cut into bite-sized pieces or strips) OR my favorite shortcut is to shred a whole rotisserie chicken.
  7. {Take 1/2 lb of raw shrimp (shelled and deveined).
  8. {Make ready 3 cups of chicken broth (or vegetable).
  9. {Get 1/4 cup of soy sauce.
  10. {Prepare 3 Tbsp of lemon juice.
  11. {Take 6 of scallions, thinly sliced to serve at the table.
  12. {Get of Lemon wedges to serve at the table.
  13. {Make ready of OPTIONS: this is a very versatile dish that is also good with pork or any combination of proteins. Vegetables such as shredded cabbage, carrots, green beans, asparagus are excellent additions as well.

Steps to make Pancit:

  1. Soak the rick sticks in a large bowl of cold water for 10 minutes. Drain and set aside..
  2. In the meantime -- in a large pot over medium heat, add the oil and sauté the onion for 4 - 5 minutes..
  3. Add the garlic and bay leaf, mix well and cook for 1 minute more..
  4. Add the chicken and stir fry for a few minutes until the pink is almost gone. (It will continue to cook after the liquid is added.).
  5. Pour in the stock, soy sauce, and lemon juice (plus a sprinkle of scallions) mix together well and bring to a simmer..
  6. Add drained rice noodle, mix together gently, trying not to break the noodle..
  7. Cover pot, lower heat and simmer for about 5 minutes,.
  8. Add shrimp, gently mix, allowing liquid to be absorbed by the noodle. Cover and simmer for about 10 minutes, checking often that the liquid is absorbing evenly. (Add more stock if noodles appear to be dry.).
  9. Continue to cook over low heat for about 10 minutes until noodle is tender but not overdone. Mix gently as needed to absorb the liquid..
  10. Serve with scallion and lemon wedges on the side..

So that is going to wrap this up for this special food pancit recipe. Thank you very much for your time. I'm confident that you will make this at home. There is gonna be more interesting food in home recipes coming up. Remember to save this page in your browser, and share it to your loved ones, friends and colleague. Thank you for reading. Go on get cooking!

Recipe of Any-night-of-the-week Creamed Spinach Tortellini with Shrimp

Recipe of Any-night-of-the-week Creamed Spinach Tortellini with Shrimp

Creamed Spinach Tortellini with Shrimp.

Creamed Spinach Tortellini with Shrimp

Hello everybody, I hope you are having an incredible day today. Today, I'm gonna show you how to make a special dish, creamed spinach tortellini with shrimp. It is one of my favorites. This time, I am going to make it a bit tasty. This will be really delicious.

Creamed Spinach Tortellini with Shrimp is one of the most favored of recent trending foods on earth. It's enjoyed by millions daily. It's simple, it is quick, it tastes yummy. Creamed Spinach Tortellini with Shrimp is something that I've loved my whole life. They are fine and they look wonderful.

To begin with this particular recipe, we must first prepare a few ingredients. You can cook creamed spinach tortellini with shrimp using 12 ingredients and 3 steps. Here is how you cook that.

The ingredients needed to make Creamed Spinach Tortellini with Shrimp:

  1. {Prepare 1 lb of Tortellini.
  2. {Take 3 tbs of butter.
  3. {Get 2 tbs of flour.
  4. {Take 1 1/2 cups of half ½.
  5. {Take 1/2 tsp of garlic powder.
  6. {Get 1/2 tsp of pepper.
  7. {Take 1/4 of nutmeg.
  8. {Prepare 1 cup of parmesan cheese.
  9. {Prepare 4 oz of cream cheese.
  10. {Prepare 16 oz of spinach.
  11. {Prepare 1 pinch of red pepper flakes.
  12. {Make ready 1 lb of shrimp.

Steps to make Creamed Spinach Tortellini with Shrimp:

  1. Clean and devein shrimp. Season with salt, pepper and oregano (or however you prefer). Broil on low which should take about 15-20 minutes. Boil water and cook pasta as directed on box..
  2. In a saucepan melt butter over medium. Whisk in flour, garlic powder and nutmeg and cook for 90 sec..
  3. Add half and half. Start with high heat and then lower the heat as it thickens to medium. Add cheese. Then add spinach in batches. Last, add the tortellini and top with shrimp..

So that is going to wrap it up with this special food creamed spinach tortellini with shrimp recipe. Thank you very much for your time. I am sure you will make this at home. There is gonna be interesting food in home recipes coming up. Remember to bookmark this page on your browser, and share it to your family, friends and colleague. Thank you for reading. Go on get cooking!

Recipe of Favorite Goat stew in tomato sauce

Recipe of Favorite Goat stew in tomato sauce

Goat stew in tomato sauce.

Goat stew in tomato sauce

Hello everybody, it is me, Dave, welcome to our recipe site. Today, we're going to prepare a distinctive dish, goat stew in tomato sauce. It is one of my favorites. For mine, I'm gonna make it a bit tasty. This is gonna smell and look delicious.

Goat stew in tomato sauce is one of the most well liked of current trending meals in the world. It is appreciated by millions daily. It's simple, it is fast, it tastes yummy. They are nice and they look fantastic. Goat stew in tomato sauce is something which I've loved my entire life.

To get started with this recipe, we must first prepare a few ingredients. You can cook goat stew in tomato sauce using 14 ingredients and 11 steps. Here is how you cook that.

The ingredients needed to make Goat stew in tomato sauce:

  1. {Prepare 1 lb of Goat meat.
  2. {Prepare of Vinegar.
  3. {Prepare 3 tablespoon of cooking oil.
  4. {Take 1 tablespoon of garlic; minced.
  5. {Make ready 1 of medium-sized onion; minced.
  6. {Make ready 3 of medium-sized tomato; diced.
  7. {Prepare 1 can of tomato sauce.
  8. {Make ready 3 pieces of bay leaves.
  9. {Make ready 2 cups of water.
  10. {Prepare 6 tablespoon of liver spread.
  11. {Get 1 of large-sized carrot.
  12. {Prepare 1 of large-sized potato.
  13. {Make ready 1 of red bell pepper; sliced.
  14. {Make ready of Salt and pepper.

Instructions to make Goat stew in tomato sauce:

  1. In a large bowl, marinate goat meat for at least an hour using a mixture of vinegar, salt and ground black pepper. (this is to remove gamey of goat meat). After an hour, remove the goat meat from the marinade. Rinse and drain meat..
  2. Heat cooking pot or casserole, pour cooking oil. When cooking oil is hot enough, sautes garlic, onion and tomatoes. Occasionally stir until aromatic.
  3. Add marinated goat meat to the mixture of sauted ingredients. Wait until the outer part of the goat meat turns brown..
  4. Add Tomato sauce and bay leaves, stir and simmer for about 2 minutes..
  5. Add water, and allow it to boil. Cover and simmer (lower heat) for at least 45 minutes or until goat meat becomes tender. In this process the sauce will reduced..
  6. Add liver spread, stir well and continue cooking for 5 more minutes. If the sauce seemed to have dried up, you can add additional water..
  7. Add potatoes and carrots, stir well and continue to simmer for another 8 minutes..
  8. Add bell pepper, stir and simmer again for another 5 minutes..
  9. Season with salt and pepper to taste..
  10. Turn off heat..
  11. Serve while hot and enjoy..

So that's going to wrap this up with this special food goat stew in tomato sauce recipe. Thank you very much for your time. I'm confident that you can make this at home. There's gonna be more interesting food at home recipes coming up. Remember to bookmark this page on your browser, and share it to your family, friends and colleague. Thanks again for reading. Go on get cooking!

Easiest Way to Prepare Ultimate Baked Bacon Wrapped Chicken

Easiest Way to Prepare Ultimate Baked Bacon Wrapped Chicken

Baked Bacon Wrapped Chicken.

Baked Bacon Wrapped Chicken

Hello everybody, I hope you are having an incredible day today. Today, I will show you a way to prepare a distinctive dish, baked bacon wrapped chicken. One of my favorites. For mine, I am going to make it a bit unique. This is gonna smell and look delicious.

Baked Bacon Wrapped Chicken is one of the most popular of recent trending foods on earth. It is simple, it is quick, it tastes delicious. It is appreciated by millions daily. They're nice and they look fantastic. Baked Bacon Wrapped Chicken is something which I've loved my whole life.

To begin with this recipe, we have to first prepare a few components. You can cook baked bacon wrapped chicken using 7 ingredients and 10 steps. Here is how you cook it.

The ingredients needed to make Baked Bacon Wrapped Chicken:

  1. {Make ready of Ingredients.
  2. {Get 2 large of chicken breasts, boneless skinless.
  3. {Take 12 of strips raw bacon.
  4. {Make ready 2 of eggs, lightly beaten.
  5. {Prepare 1 cup of all-purpose flour.
  6. {Make ready 1 cup of bread crumbs.
  7. {Make ready 1/2 tsp of each, black pepper, garlic powder, chili powder.

Instructions to make Baked Bacon Wrapped Chicken:

  1. Preheat oven to 425°F.
  2. Season chicken if desired.
  3. Cut chicken into strips. It help cutting if the chicken is semi frozen.
  4. Mix flour and spices.
  5. Take a strip of bacon, wrap around end to end on chicken strip. Secure with toothpicks.
  6. Roll wrapped chicken in flour spice mixture.
  7. Coat in egg.
  8. Roll in bread crumbs.
  9. Place in cookie sheet and bake at 425°F for 30 to 45 minutes or until golden, turning half way thru cooking and juices run clear..
  10. Serve and enjoy.

So that is going to wrap this up for this special food baked bacon wrapped chicken recipe. Thanks so much for your time. I am confident you can make this at home. There's gonna be more interesting food in home recipes coming up. Don't forget to bookmark this page on your browser, and share it to your family, friends and colleague. Thank you for reading. Go on get cooking!

Step-by-Step Guide to Make Quick Eggless wheat flour cookies

Step-by-Step Guide to Make Quick Eggless wheat flour cookies

Eggless wheat flour cookies.

Eggless wheat flour cookies

Hey everyone, it is John, welcome to my recipe page. Today, I will show you a way to prepare a special dish, eggless wheat flour cookies. It is one of my favorites food recipes. For mine, I will make it a little bit unique. This is gonna smell and look delicious.

Eggless wheat flour cookies is one of the most favored of recent trending meals on earth. It's simple, it is quick, it tastes delicious. It is appreciated by millions daily. Eggless wheat flour cookies is something that I have loved my entire life. They're nice and they look wonderful.

To get started with this particular recipe, we must prepare a few ingredients. You can have eggless wheat flour cookies using 9 ingredients and 10 steps. Here is how you cook it.

The ingredients needed to make Eggless wheat flour cookies:

  1. {Make ready 1/2 cup of unsalted butter room temperature.
  2. {Make ready 3/4 cup of icing sugar/ powdered sugarj.
  3. {Prepare 1 cup of wheat flour.
  4. {Take 1/2 tsp of baking powder.
  5. {Get 1/4 tsp of baking soda.
  6. {Get Pinch of salt.
  7. {Prepare 1/4 tsp of vanilla essence.
  8. {Make ready 3 tbsp of milk room temperature.
  9. {Get of Few Sprinkles for topping.

Steps to make Eggless wheat flour cookies:

  1. Firstly, in a large mixing bowl take 1/2 cup unsalted butter and 3/4cup powdered sugar..
  2. Beat the sugar and butter well with the help of hand mixer or whisk..
  3. Further add 1 cup wheat flour, ½ tsp baking powder, ¼ tsp baking soda and pinch of salt..
  4. Additionally add ¼ tsp vaniila extract..
  5. Mix and crumble the ingredients well with hand. add 3 tbsp milk and start to combine well..
  6. Do not knead, just combine to form a dough..
  7. Now flatten and roll out slightly thick with the help of rolling pin..
  8. Now make it in desired shape and top them with few sprinkles and press with light pressure. place the shaped cookies on to a tray lined with baking paper..
  9. Bake the biscuits in preheated oven at 250 degree celsius for 25 minutes or till the edges turn slightly golden.
  10. Allow the biscuit to cool completely. biscuits will be soft when hot, and turns crunchy when cooled..

So that is going to wrap this up for this special food eggless wheat flour cookies recipe. Thank you very much for your time. I'm confident you can make this at home. There is gonna be more interesting food in home recipes coming up. Don't forget to bookmark this page on your browser, and share it to your family, colleague and friends. Thanks again for reading. Go on get cooking!

Recipe of Quick Salmon or Tuna Patties

Recipe of Quick Salmon or Tuna Patties

Salmon or Tuna Patties.

Salmon or Tuna Patties

Hey everyone, hope you are having an amazing day today. Today, I will show you a way to prepare a distinctive dish, salmon or tuna patties. It is one of my favorites. For mine, I'm gonna make it a bit tasty. This is gonna smell and look delicious.

Salmon or Tuna Patties is one of the most favored of recent trending meals on earth. It's appreciated by millions daily. It's simple, it's fast, it tastes delicious. They are nice and they look wonderful. Salmon or Tuna Patties is something that I've loved my entire life.

To begin with this recipe, we have to first prepare a few components. You can have salmon or tuna patties using 6 ingredients and 4 steps. Here is how you can achieve it.

The ingredients needed to make Salmon or Tuna Patties:

  1. {Get 15 Oz. of Salmon or Tuna.
  2. {Make ready 1/4 Cup of Chopped Onions.
  3. {Get 1/2 Cup of Seasoned Bread Crumbs.
  4. {Prepare 1 of Egg.
  5. {Get 1 Tbsp of Olive Oil.
  6. {Prepare of Salt and Pepper to your liking.

Steps to make Salmon or Tuna Patties:

  1. Shred the salmon or tuna (canned would work fine just be sure to drain first) then incorporate remaining ingredients in a medium bowl.
  2. Hand create the patties to your liking..
  3. Lightly coat pan with olive oil and place over medium-low heat..
  4. Cook both sides of the party until browned..

So that is going to wrap it up with this exceptional food salmon or tuna patties recipe. Thanks so much for reading. I am sure you can make this at home. There's gonna be more interesting food at home recipes coming up. Remember to save this page in your browser, and share it to your loved ones, colleague and friends. Thanks again for reading. Go on get cooking!

Easiest Way to Make Favorite Cheesy Bajra Pancakes

Easiest Way to Make Favorite Cheesy Bajra Pancakes

Cheesy Bajra Pancakes.

Cheesy Bajra Pancakes

Hello everybody, it's Brad, welcome to my recipe page. Today, I'm gonna show you how to prepare a distinctive dish, cheesy bajra pancakes. One of my favorites. This time, I will make it a bit unique. This is gonna smell and look delicious.

Cheesy Bajra Pancakes is one of the most well liked of recent trending meals in the world. It's enjoyed by millions daily. It's simple, it is fast, it tastes yummy. They are fine and they look wonderful. Cheesy Bajra Pancakes is something that I've loved my entire life.

To get started with this particular recipe, we must prepare a few components. You can cook cheesy bajra pancakes using 11 ingredients and 3 steps. Here is how you cook it.

The ingredients needed to make Cheesy Bajra Pancakes:

  1. {Make ready 1 cup of Bajra flour.
  2. {Take 1/2 cup of besan.
  3. {Make ready as required of Spring Onion chopped.
  4. {Take as needed of Coriander chopped.
  5. {Take 1/2 tsp of turmeric powder.
  6. {Take 1/4 tsp of Hing / asafoetida.
  7. {Get 1 tsp of Chilli powder.
  8. {Get 1 tbsp of garlic paste.
  9. {Get 1/2 tsp of black pepper powder.
  10. {Take as per taste of Salt.
  11. {Prepare As Per Required of Chesse for Garnishing.

Steps to make Cheesy Bajra Pancakes:

  1. Take Bajra flour and Besan in mixing bowl, add all spices, spring onion and coriander..
  2. Mix well add water and make medium consistency batter..
  3. Heat the pan grease with oil and pour batter cook it from both the sides and make it crisp.Grate Cheese on Pancakes and serve with chutney, ketchup..

So that is going to wrap this up for this exceptional food cheesy bajra pancakes recipe. Thank you very much for your time. I'm sure you can make this at home. There's gonna be more interesting food at home recipes coming up. Don't forget to bookmark this page on your browser, and share it to your family, colleague and friends. Thank you for reading. Go on get cooking!

Recipe of Perfect Sweet & Spicy broccoli and chicken

Recipe of Perfect Sweet & Spicy broccoli and chicken

Sweet & Spicy broccoli and chicken.

Sweet & Spicy broccoli and chicken

Hey everyone, I hope you are having an incredible day today. Today, I will show you a way to prepare a distinctive dish, sweet & spicy broccoli and chicken. One of my favorites food recipes. For mine, I'm gonna make it a little bit unique. This is gonna smell and look delicious.

Sweet & Spicy broccoli and chicken is one of the most well liked of current trending meals in the world. It is enjoyed by millions daily. It is simple, it's fast, it tastes delicious. Sweet & Spicy broccoli and chicken is something that I have loved my entire life. They're nice and they look wonderful.

To begin with this particular recipe, we must prepare a few components. You can cook sweet & spicy broccoli and chicken using 7 ingredients and 5 steps. Here is how you can achieve that.

The ingredients needed to make Sweet & Spicy broccoli and chicken:

  1. {Make ready 1 1/2 lb of Chicken Strips.
  2. {Take 3 clove of garlic cloves.
  3. {Get 1/2 cup of soy sauce.
  4. {Get 1 of ground ginger.
  5. {Get 1 of Texas Pete hotter hot sauce.
  6. {Take 1 of brown sugar.
  7. {Take 1 lb of Frozen cut broccoli.

Steps to make Sweet & Spicy broccoli and chicken:

  1. Wash and cut chicken strips into chunks add salt and pepper (set aside). Chop garlic cloves..
  2. Combine garlic, soy sauce, hot sauce, ginger and brown sugar in bowl. Tweak it to your desired sweetness and hotness..
  3. Add oil to skillet. Add chicken and cook til chicken turns white on both sides. Add broccoli and stir..
  4. Add the bowl of sauce to chicken and broccoli. Simmer for about 10 mins. (I added a little water to make more sauce)..
  5. Serve over white rice. Enjoy!.

So that's going to wrap it up for this exceptional food sweet & spicy broccoli and chicken recipe. Thanks so much for reading. I am confident that you can make this at home. There is gonna be interesting food at home recipes coming up. Remember to bookmark this page in your browser, and share it to your loved ones, friends and colleague. Thanks again for reading. Go on get cooking!

Recipe of Favorite LG FRESH SIMPLE CHILI PASTE

Recipe of Favorite LG FRESH SIMPLE CHILI PASTE

LG FRESH SIMPLE CHILI PASTE.

LG FRESH SIMPLE CHILI PASTE

Hello everybody, it's me, Dave, welcome to our recipe page. Today, we're going to prepare a distinctive dish, lg fresh simple chili paste. One of my favorites. This time, I'm gonna make it a little bit tasty. This is gonna smell and look delicious.

LG FRESH SIMPLE CHILI PASTE is one of the most popular of current trending foods in the world. It is easy, it's quick, it tastes delicious. It is appreciated by millions daily. They are nice and they look fantastic. LG FRESH SIMPLE CHILI PASTE is something that I've loved my entire life.

To get started with this particular recipe, we must first prepare a few components. You can have lg fresh simple chili paste using 4 ingredients and 2 steps. Here is how you can achieve it.

The ingredients needed to make LG FRESH SIMPLE CHILI PASTE:

  1. {Make ready 5 small of shallot.
  2. {Take 5 clove of garlic.
  3. {Get 1 of thumb size ginger.
  4. {Take 5 of fresh red chili or deseeded optional.

Instructions to make LG FRESH SIMPLE CHILI PASTE:

  1. put all ingredient into pounder till smooth.
  2. can refrigerate for 1 week.

So that is going to wrap this up with this special food lg fresh simple chili paste recipe. Thank you very much for your time. I am sure you will make this at home. There is gonna be more interesting food in home recipes coming up. Remember to bookmark this page in your browser, and share it to your family, friends and colleague. Thanks again for reading. Go on get cooking!

Step-by-Step Guide to Prepare Award-winning Lauren's Turkey Sausage
Chili

Step-by-Step Guide to Prepare Award-winning Lauren's Turkey Sausage Chili

Lauren's Turkey Sausage Chili.

Lauren's Turkey Sausage Chili

Hey everyone, hope you are having an amazing day today. Today, I will show you a way to make a distinctive dish, lauren's turkey sausage chili. One of my favorites food recipes. This time, I'm gonna make it a little bit tasty. This will be really delicious.

Lauren's Turkey Sausage Chili is one of the most well liked of recent trending meals on earth. It's enjoyed by millions daily. It's simple, it's fast, it tastes delicious. They're fine and they look wonderful. Lauren's Turkey Sausage Chili is something which I have loved my entire life.

To begin with this particular recipe, we must first prepare a few ingredients. You can cook lauren's turkey sausage chili using 20 ingredients and 9 steps. Here is how you can achieve it.

The ingredients needed to make Lauren's Turkey Sausage Chili:

  1. {Prepare 1 lb of ground turkey.
  2. {Make ready 1/2 of roll of breakfast sausage.
  3. {Prepare 2 (14.5 oz) of can diced tomatoes.
  4. {Take 2 (14.5 oz) of can pinto beans.
  5. {Take 6 oz of tomato paste.
  6. {Take 2 1/2 cups of chicken broth.
  7. {Take 1 of large onion diced.
  8. {Get 2 of jalapenos 1 diced, 1 chopped to your liking.
  9. {Make ready 1 of green or red bell pepper, chopped.
  10. {Take 8 of garlic cloves, minced.
  11. {Prepare 4 tbsp of chili powder.
  12. {Get 1 tsp of Cayenne pepper.
  13. {Make ready 2 tsp of smoked paprika.
  14. {Take 1 tsp of ground cumin.
  15. {Prepare 2 tsp of dried oregano.
  16. {Prepare 2 tsp of brown sugar.
  17. {Make ready 3 tsp of cocoa powder.
  18. {Prepare 1/2 tsp of salt.
  19. {Get 4 tbsp of olive oil.
  20. {Make ready of Sour cream and Mexican blend cheese.

Instructions to make Lauren's Turkey Sausage Chili:

  1. In a large Dutch oven or large pot heat 2 tablespoon of olive oil. Add onion, garlic and both types of peppers and cook over medium heat stirring occasionally for 10 minutes..
  2. In medium sauté pan heat the remaining 2 tablespoons of olive oil and add ground turkey meat and breakfast sausage and Cook, stirring constantly and breaking up the big chunks with a fork until the liquid evaporates and meat is thoroughly cooked and slightly brown..
  3. Add cooked meat into a pot with an onion and pepper mixture..
  4. Pour in diced tomatoes and beans..
  5. Dilute tomato paste with 1 cup of chicken broth and add into a pot..
  6. Add chili powder, cayenne pepper, smoked paprika, oregano, cumin, brown sugar, cocoa powder, the remaining chicken broth and ½ teaspoon of salt..
  7. Give everything a good stir, cover with a lid and reduce the heat to low. If the soup becomes too thick, add ½ cup of chicken broth..
  8. Simmer for about 30 minutes to hour..
  9. Adjust the seasoning and serve immediately with shredded Cheddar cheese and a dollop of sour cream and tortilla crisps..

So that's going to wrap it up for this exceptional food lauren's turkey sausage chili recipe. Thank you very much for reading. I am sure you can make this at home. There is gonna be more interesting food in home recipes coming up. Remember to save this page on your browser, and share it to your family, colleague and friends. Thanks again for reading. Go on get cooking!

Recipe of Favorite Mutton curry

Recipe of Favorite Mutton curry

Mutton curry.

Mutton curry

Hello everybody, it's Jim, welcome to my recipe page. Today, we're going to make a distinctive dish, mutton curry. One of my favorites. This time, I will make it a little bit unique. This is gonna smell and look delicious.

Mutton curry is one of the most favored of recent trending meals on earth. It's simple, it's quick, it tastes yummy. It's enjoyed by millions daily. Mutton curry is something which I have loved my entire life. They are fine and they look wonderful.

To begin with this particular recipe, we have to first prepare a few ingredients. You can cook mutton curry using 14 ingredients and 8 steps. Here is how you can achieve it.

The ingredients needed to make Mutton curry:

  1. {Make ready 1 kg of mutton with bones, washed and kept aside.
  2. {Make ready 2 of medium-sized onions, finely chopped.
  3. {Get 2-3 of tomatoes pureed.
  4. {Prepare 1-2 of green chillies sliced.
  5. {Take 3 tablespoons of ghee.
  6. {Prepare 1 teaspoon of fresh ginger cut into juvenile.
  7. {Take 1 teaspoon of fresh garlic grounded.
  8. {Make ready 5-6 of green cardamoms crushed.
  9. {Get 1 of clove.
  10. {Make ready 1 of Bay leaf.
  11. {Prepare 2 of black cardamoms.
  12. {Make ready 1 of cinnamon stick.
  13. {Take 2 of peppercorns.
  14. {Prepare of Fresh coriander and mint leaves chopped for garnish.

Instructions to make Mutton curry:

  1. Heat desi ghee in a pressure cooker. Add all the whole spices except green cardamom..
  2. Just when the spices begin to crackle, add chopped onions. Fry onions till they turn golden brown..
  3. Add ginger garlic and saute for a minute. Do not over fry ginger/garlic. Add mutton and salt. Adding salt at this stage helps to cook mutton quicker. Fry mutton till it turns reddish-brown..
  4. Add pureed tomatoes and crushed green cardamom a. Saute till ghee starts to separate. Add sliced green chilies..
  5. Add 2 cups of water and pressure cook for 10-15 minutes—the time in which mutton cooks depends on the quality of the meat used..
  6. Turn off the flame and let it rest for 5 minutes. Remove the cover of the cooker and give the curry a good boil for 5-7 minutes. You can reduce the consistency of the curry as per your taste and requirement..
  7. Garnish with fresh chopped coriander and mint leaves.
  8. Serve hot with steamed rice..

So that's going to wrap it up for this special food mutton curry recipe. Thank you very much for your time. I'm confident you will make this at home. There's gonna be interesting food in home recipes coming up. Don't forget to save this page in your browser, and share it to your family, friends and colleague. Thanks again for reading. Go on get cooking!

Simple Way to Prepare Quick Easy Rice Flour and Kinako Snowball Cookies

Simple Way to Prepare Quick Easy Rice Flour and Kinako Snowball Cookies

Easy Rice Flour and Kinako Snowball Cookies.

Easy Rice Flour and Kinako Snowball Cookies

Hey everyone, it's Drew, welcome to my recipe page. Today, I'm gonna show you how to make a special dish, easy rice flour and kinako snowball cookies. One of my favorites food recipes. For mine, I am going to make it a bit tasty. This is gonna smell and look delicious.

Easy Rice Flour and Kinako Snowball Cookies is one of the most favored of recent trending foods on earth. It is enjoyed by millions every day. It's easy, it is quick, it tastes delicious. Easy Rice Flour and Kinako Snowball Cookies is something that I've loved my whole life. They are fine and they look fantastic.

To begin with this recipe, we have to prepare a few components. You can have easy rice flour and kinako snowball cookies using 6 ingredients and 5 steps. Here is how you cook it.

The ingredients needed to make Easy Rice Flour and Kinako Snowball Cookies:

  1. {Prepare 100 grams of Rice flour (or cake flour).
  2. {Take 20 grams of Kinako.
  3. {Prepare 40 grams of Sugar.
  4. {Make ready 4 tbsp of Vegetable oil or olive oil.
  5. {Prepare 3 tbsp of Milk.
  6. {Make ready 1 of Powdered sugar.

Instructions to make Easy Rice Flour and Kinako Snowball Cookies:

  1. Combine the rice flour, kinako, and sugar in a plastic bag, and mix well. Add the vegetable oil, and massage the contents of the bag until evenly incorporated..
  2. Gradually add milk a little at a time..
  3. Roll the dough into small balls and arrange on a baking tray lined with parchment paper..
  4. Bake for about 20 minutes in an oven preheated to 180℃, then place the baking tray on a cooling rack to cool..
  5. Put the powdered sugar on a tray and roll the cookies in the sugar while they're still hot..

So that's going to wrap it up with this exceptional food easy rice flour and kinako snowball cookies recipe. Thanks so much for your time. I am sure that you can make this at home. There is gonna be more interesting food at home recipes coming up. Remember to save this page in your browser, and share it to your family, colleague and friends. Thank you for reading. Go on get cooking!

How to Make Perfect Cute and Easy Spritz Cookies for Hina Matsuri (Doll
Festival)

How to Make Perfect Cute and Easy Spritz Cookies for Hina Matsuri (Doll Festival)

Cute and Easy Spritz Cookies for Hina Matsuri (Doll Festival).

Cute and Easy Spritz Cookies for Hina Matsuri (Doll Festival)

Hey everyone, it is me again, Dan, welcome to our recipe site. Today, I will show you a way to prepare a distinctive dish, cute and easy spritz cookies for hina matsuri (doll festival). One of my favorites food recipes. For mine, I'm gonna make it a bit tasty. This is gonna smell and look delicious.

Cute and Easy Spritz Cookies for Hina Matsuri (Doll Festival) is one of the most popular of current trending foods on earth. It's easy, it is quick, it tastes delicious. It is enjoyed by millions every day. They're nice and they look fantastic. Cute and Easy Spritz Cookies for Hina Matsuri (Doll Festival) is something which I have loved my whole life.

To get started with this recipe, we have to first prepare a few ingredients. You can have cute and easy spritz cookies for hina matsuri (doll festival) using 7 ingredients and 18 steps. Here is how you can achieve it.

The ingredients needed to make Cute and Easy Spritz Cookies for Hina Matsuri (Doll Festival):

  1. {Get 90 grams of Cake flour.
  2. {Get of If cake flour 60 g + katakuriko 40 g = 100 g is substituted for the 90 g of cake flour, the result will be a lighter texture..
  3. {Prepare 40 grams of Margarine or butter.
  4. {Make ready 40 grams of Milk.
  5. {Make ready 30 grams of Sugar (white sugar).
  6. {Get 1 dash of Matcha.
  7. {Get 1 small of quantity on the tip of a toothpick Red food coloring.

Instructions to make Cute and Easy Spritz Cookies for Hina Matsuri (Doll Festival):

  1. For a variation on this recipe, see.
  2. Melt the margarine and milk in the microwave for 5-10 seconds. I recommend using margarine to play up the flavors of matcha and anko..
  3. Add in the sugar and mix well..
  4. Add the flour and mix. There's no need to sift..
  5. Divide the dough roughly into 4 parts. Mix in about the same amount of anko (not listed in ingredients) as the dough..
  6. The anko dough will be a larger quantity due to the addition of anko so take care to set aside a smaller portion..
  7. Make the red food coloring cookie dough and matcha dough. Adjust the food coloring/matcha powder according to your own taste..
  8. Stack each dough on a piece of plastic wrap..
  9. Roll the wrap as though you are using a sushi rolling mat. Take care not to roll the plastic wrap into the dough..
  10. Put the plastic-wrapped roll into a pastry bag. A bigger pastry bag will be easier to use. Here, I used a star-shaped tip..
  11. Pipe the dough in a circular fashion. The individual colored dough will come out beautifully together..
  12. Piping a wavy pattern is beautiful too..
  13. If you pipe the dough into smaller cookies, they'll be similar to hina arare (Doll Festival cookies) and look cuter..
  14. If decorating with dragées they should be sprinkled on the cookie dough before baking. If decorating with chocolate wait until the cookies are baked..
  15. Preheat oven to 170°C (338 Fahrenheit). Bake for 12-15 minutes at 170°C (338 Fahrenheit). Adjust time according to the brownness of the cookies..
  16. Even a little bit of decoration makes these cookies cute! The kids loved them..
  17. Decorated with sugar craft. It's ideal for times when you want to make just a little. https://cookpad.com/us/recipes/146717-sugar-crafted-flowers.
  18. Here they are in a simpler arrangement with a greater Japanese influence..

So that's going to wrap this up for this special food cute and easy spritz cookies for hina matsuri (doll festival) recipe. Thanks so much for reading. I am sure that you can make this at home. There's gonna be more interesting food at home recipes coming up. Don't forget to bookmark this page on your browser, and share it to your loved ones, friends and colleague. Thank you for reading. Go on get cooking!

Steps to Prepare Super Quick Homemade Reese's No Bake Dessert

Steps to Prepare Super Quick Homemade Reese's No Bake Dessert

Reese's No Bake Dessert.

Reese's No Bake Dessert

Hello everybody, it is Jim, welcome to my recipe site. Today, we're going to prepare a special dish, reese's no bake dessert. It is one of my favorites. This time, I will make it a bit unique. This is gonna smell and look delicious.

Reese's No Bake Dessert is one of the most well liked of current trending meals in the world. It is enjoyed by millions every day. It is simple, it is quick, it tastes delicious. They are nice and they look fantastic. Reese's No Bake Dessert is something which I've loved my entire life.

To get started with this recipe, we must first prepare a few ingredients. You can cook reese's no bake dessert using 13 ingredients and 8 steps. Here is how you can achieve that.

The ingredients needed to make Reese's No Bake Dessert:

  1. {Make ready 1 pack of nutterbutter cookies.
  2. {Get 1/4 cup of chocolate sprinkles.
  3. {Prepare 1/2 cup of melted butter.
  4. {Prepare 1 cup of heavy whipping cream.
  5. {Take 8 oz of cream cheese.
  6. {Take 1 cup of peanut butter.
  7. {Take 1 cup of confectioners sugar.
  8. {Prepare 1 tsp of vanilla extract.
  9. {Prepare 14 oz of sweetened condensed milk.
  10. {Prepare 24 pieces of peanut butter cups.
  11. {Prepare 1/8 cup of melted chocolate.
  12. {Get 1/8 cup of chocolate chips.
  13. {Make ready 1/8 of reese's pieces.

Instructions to make Reese's No Bake Dessert:

  1. Crush nutter butters and mix with chocolate sprinkles and melted butter..
  2. Press into bottom of 9x13 pan and refrigerate for 15 minutes..
  3. In large bowl whisk heavy cream until frothy..
  4. Add cream cheese, peanut butter, confectionery sugar, vanilla extract and sweetened condensed milk. Blend well..
  5. Place peanut butter cups face down on crust..
  6. Spread mixture on top of crust..
  7. Add melted chocolate, reese's pieces, or any other toppings you choose.
  8. Refrigerate and enjoy..

So that is going to wrap this up with this special food reese's no bake dessert recipe. Thank you very much for your time. I'm sure that you will make this at home. There is gonna be more interesting food in home recipes coming up. Remember to save this page on your browser, and share it to your loved ones, friends and colleague. Thanks again for reading. Go on get cooking!

Recipe of Award-winning Japanese-Style Fried Rice with Chirimen Jako
and Nozawana

Recipe of Award-winning Japanese-Style Fried Rice with Chirimen Jako and Nozawana

Japanese-Style Fried Rice with Chirimen Jako and Nozawana.

Japanese-Style Fried Rice with Chirimen Jako and Nozawana

Hey everyone, hope you're having an incredible day today. Today, I will show you a way to make a special dish, japanese-style fried rice with chirimen jako and nozawana. One of my favorites. This time, I'm gonna make it a bit unique. This is gonna smell and look delicious.

Japanese-Style Fried Rice with Chirimen Jako and Nozawana is one of the most favored of current trending meals on earth. It is easy, it is quick, it tastes yummy. It's enjoyed by millions every day. They are nice and they look wonderful. Japanese-Style Fried Rice with Chirimen Jako and Nozawana is something that I have loved my entire life.

To begin with this particular recipe, we have to prepare a few components. You can cook japanese-style fried rice with chirimen jako and nozawana using 10 ingredients and 6 steps. Here is how you cook that.

The ingredients needed to make Japanese-Style Fried Rice with Chirimen Jako and Nozawana:

  1. {Get 400 grams of Leftover cooked white rice.
  2. {Make ready 2 of Eggs.
  3. {Make ready 100 grams of Nozawana.
  4. {Prepare 25 grams of Chirimen Jako.
  5. {Make ready 4 of cm Japanese leek.
  6. {Take 1 pinch of Salt.
  7. {Make ready 1 dash of Pepper.
  8. {Make ready 2 tsp of Dashi stock powder.
  9. {Make ready 1 tsp of Soy sauce.
  10. {Get 1 tbsp of + 1 teaspoon Oil.

Instructions to make Japanese-Style Fried Rice with Chirimen Jako and Nozawana:

  1. Finely chop the nozawana and Japanese leek..
  2. Crack open 1 egg in a bowl, season with salt and pepper (not listed in the ingredients list), and beat the egg..
  3. Heat 1 teaspoon of vegetable oil in a frying pan, pour in the beaten egg from Step 2, make scrambled egg, and transfer to a plate..
  4. Put the leftover cooked rice in a large microwave-proof container, and warm it up in the microwave. Sprinkle on the dashi stock powder, salt, and pepper. Then pour in 1 beaten egg, and mix everything together..
  5. Heat 1 tablespoon of vegetable oil in a frying pan, add the rice from Step 4, and stir-fry over medium heat until the rice has loosened up. Add the nozawana and Japanese leek and continue stir-frying..
  6. Add the chirimen jako. Once it's mixed in, drizzle the soy sauce in from the sides of the pan and stir-fry. Finally add the scrambled egg from Step 3, and once it's mixed in, serve and enjoy!.

So that is going to wrap this up with this exceptional food japanese-style fried rice with chirimen jako and nozawana recipe. Thank you very much for reading. I'm confident that you can make this at home. There's gonna be more interesting food in home recipes coming up. Remember to save this page in your browser, and share it to your loved ones, colleague and friends. Thanks again for reading. Go on get cooking!

Easiest Way to Make Ultimate carla's chocolate biscuit cake

Easiest Way to Make Ultimate carla's chocolate biscuit cake

carla's chocolate biscuit cake. No Bake Chocolate Biscuit Cake, many of us are familiar with it since childhood, in various shapes and forms. Chocolaty, rich dessert made with crushed. Chocolate Biscuit Cake recipe made for Prince William and Prince Harry by Carolyn Robb from The Royal Touch Cookbook.

carla's chocolate biscuit cake This straightforward chocolate biscuit cake recipe is the perfect delicious treat to share with all your guests for afternoon tea! Melt the butter, syrup and chocolate in a pan over a low heat. Of all the biscuit cakes I ever made this one is by far and away the favourite and it is 'suitable' for adults and children alike!

Hey everyone, hope you are having an incredible day today. Today, we're going to make a distinctive dish, carla's chocolate biscuit cake. One of my favorites. For mine, I am going to make it a little bit unique. This will be really delicious.

carla's chocolate biscuit cake is one of the most favored of recent trending foods on earth. It's enjoyed by millions every day. It is easy, it is fast, it tastes yummy. carla's chocolate biscuit cake is something that I have loved my entire life. They are fine and they look fantastic.

No Bake Chocolate Biscuit Cake, many of us are familiar with it since childhood, in various shapes and forms. Chocolaty, rich dessert made with crushed. Chocolate Biscuit Cake recipe made for Prince William and Prince Harry by Carolyn Robb from The Royal Touch Cookbook.

To get started with this recipe, we must first prepare a few ingredients. You can cook carla's chocolate biscuit cake using 5 ingredients and 3 steps. Here is how you can achieve that.

The ingredients needed to make carla's chocolate biscuit cake:

  1. {Make ready 200 grams of butter.
  2. {Prepare 1 of nestle milk big size ( better to get zero fat ).
  3. {Make ready 4 tbsp of cocoa powder.
  4. {Prepare 2 of paquets biscuit.
  5. {Take 1 of almond for decoration.

Pour the chocolate and biscuit mixture into the lined cake tin, gently press down to ensure the chocolate is holding firm. This recipe for chocolate biscuit cake was inspired by the wedding of William & Kate where this favourite of the royal family was served as the grooms The inspiration for this chocolate biscuit cake came when I went for a stroll downtown with the kids a couple of days ago. We came up with the idea. Store biscuits and cakes separately: biscuits stored in the same container as sponge cakes will turn soggy.

Instructions to make carla's chocolate biscuit cake:

  1. place butter in pan ,once melted, put nestle for 2 mns, and add the cocoa powder. turn off fire..
  2. in a bowl, place the biscuits after making them small pieces..
  3. mix all ingredients together and decorate it with almonds, place in fridge..

Homemade biscuits will usually keep for up to Incorporate chocolate into any biscuit recipe, either when making the biscuit dough, or once it's been made. Milk, white or dark chocolate can be. Super easy homemade dessert recipe. · No bake chocolate biscuit cake also known as chocolate fridge cake is a must-try treat. Jam-packed full of biscuits, chocolate, Malteasers and cherries, this makes the ultimate birthday cake. Melt the butter, syrup and chocolate in a pan over a low heat.

So that is going to wrap it up with this special food carla's chocolate biscuit cake recipe. Thanks so much for reading. I'm sure that you will make this at home. There is gonna be interesting food at home recipes coming up. Don't forget to bookmark this page in your browser, and share it to your family, colleague and friends. Thanks again for reading. Go on get cooking!

Simple Way to Make Perfect Dump cake peach cobbler

Simple Way to Make Perfect Dump cake peach cobbler

Dump cake peach cobbler.

Dump cake peach cobbler

Hello everybody, I hope you're having an amazing day today. Today, I'm gonna show you how to prepare a special dish, dump cake peach cobbler. It is one of my favorites. This time, I'm gonna make it a bit tasty. This will be really delicious.

Dump cake peach cobbler is one of the most well liked of recent trending meals on earth. It is enjoyed by millions daily. It's easy, it's quick, it tastes delicious. They're fine and they look wonderful. Dump cake peach cobbler is something that I have loved my entire life.

To get started with this recipe, we have to first prepare a few components. You can cook dump cake peach cobbler using 5 ingredients and 7 steps. Here is how you cook it.

The ingredients needed to make Dump cake peach cobbler:

  1. {Prepare 1 box of Duncan Hines yellow cake mix.
  2. {Prepare 1 can of peach pie filling.
  3. {Get 1 stick of butter.
  4. {Prepare of Season of nutmeg and cinnamon.
  5. {Take of Vanilla flavoring or extract.

Steps to make Dump cake peach cobbler:

  1. Pour peach pie filling in 8x8 casserole dish.
  2. Add two nutmeg cinnamon and vanilla flavoring to peaches.
  3. Pour half a box of yellow cake mix over the top.
  4. Cut up butter in slices place over the cake mix.
  5. Placing in 350-degree degree oven.
  6. Cook until done.
  7. .

So that's going to wrap this up for this special food dump cake peach cobbler recipe. Thanks so much for your time. I am confident that you will make this at home. There is gonna be interesting food at home recipes coming up. Don't forget to bookmark this page on your browser, and share it to your family, colleague and friends. Thanks again for reading. Go on get cooking!

Easiest Way to Prepare Perfect Pub cheese pizza with chicken, spinach,
and bacon

Easiest Way to Prepare Perfect Pub cheese pizza with chicken, spinach, and bacon

Pub cheese pizza with chicken, spinach, and bacon.

Pub cheese pizza with chicken, spinach, and bacon

Hey everyone, hope you are having an amazing day today. Today, I will show you a way to prepare a distinctive dish, pub cheese pizza with chicken, spinach, and bacon. It is one of my favorites. For mine, I will make it a bit tasty. This will be really delicious.

Pub cheese pizza with chicken, spinach, and bacon is one of the most favored of recent trending meals on earth. It is appreciated by millions daily. It is simple, it's quick, it tastes delicious. They're nice and they look fantastic. Pub cheese pizza with chicken, spinach, and bacon is something which I've loved my entire life.

To begin with this particular recipe, we must prepare a few components. You can cook pub cheese pizza with chicken, spinach, and bacon using 7 ingredients and 7 steps. Here is how you cook it.

The ingredients needed to make Pub cheese pizza with chicken, spinach, and bacon:

  1. {Make ready 1/2 cup (53 g) of Kodiak power cake mix.
  2. {Get 1/2 tsp of active dry yeast.
  3. {Get 2.5 oz of precooked rotisserie chicken breast.
  4. {Get 2 tbsp of garlic & herb pub cheese.
  5. {Make ready 1/2 ounce of fresh spinach.
  6. {Make ready 1 tbsp of bacon bits.
  7. {Get 3/4 of serving of low fat cheddar jack.

Instructions to make Pub cheese pizza with chicken, spinach, and bacon:

  1. Add dry yeast to Kodiak mix.
  2. Add warm water 1/4 cup.
  3. You should have a sticky fluffy dough cover and let rise for 1 hour in a warm place.
  4. After rising spread out into a small cast iron pan that you have sprayed well.
  5. Mix together pub cheese, chicken, bacon and spinach place on top of dough.
  6. I used 3/4 a package serving of cheddar jack for coverage. Bake in a 375 degree oven for 25 minutes.
  7. MFP information.

So that's going to wrap this up with this special food pub cheese pizza with chicken, spinach, and bacon recipe. Thanks so much for your time. I'm sure that you can make this at home. There is gonna be more interesting food at home recipes coming up. Remember to save this page in your browser, and share it to your family, friends and colleague. Thanks again for reading. Go on get cooking!

How to Prepare Favorite Beefy Mac & Cheese Soup

How to Prepare Favorite Beefy Mac & Cheese Soup

Beefy Mac & Cheese Soup.

Beefy Mac & Cheese Soup

Hey everyone, it is Louise, welcome to our recipe site. Today, I will show you a way to make a special dish, beefy mac & cheese soup. One of my favorites food recipes. For mine, I'm gonna make it a bit tasty. This will be really delicious.

Beefy Mac & Cheese Soup is one of the most popular of recent trending foods in the world. It's enjoyed by millions every day. It is easy, it is fast, it tastes delicious. Beefy Mac & Cheese Soup is something that I have loved my entire life. They're fine and they look fantastic.

To get started with this recipe, we must first prepare a few ingredients. You can have beefy mac & cheese soup using 12 ingredients and 5 steps. Here is how you cook that.

The ingredients needed to make Beefy Mac & Cheese Soup:

  1. {Make ready 1 lb of ground beef.
  2. {Make ready 2 tbs of butter.
  3. {Take 1/2 tsp of salt.
  4. {Take 1/4 tsp of pepper.
  5. {Get 6 cups of chicken broth (I use low sodium).
  6. {Prepare 8 oz of elbow macaroni (or other small macaroni type pasta).
  7. {Get 4 cups of milk.
  8. {Make ready 3 tbs of flour.
  9. {Make ready 1/8 tsp of cayenne.
  10. {Prepare 4 oz of cream cheese - softened, cubed.
  11. {Get 3 cups of sharp cheddar - freshly shredded.
  12. {Make ready to taste of additional salt and pepper.

Steps to make Beefy Mac & Cheese Soup:

  1. Heat a 4 quart pot over medium heat. Add butter, ground beef, salt, and pepper. Crumble and cook until just brown. Do not drain..
  2. Add chicken broth to pot. Bring to a boil. As soon as it boils stir in macaroni. Cover and boil 10 minutes, stirring once or twice. While macaroni cooks wisk milk, flour, and cayenne together in a large bowl..
  3. When time is up stir milk mixture into pot. Bring soup back to a simmer, stirring frequently to prevent sticking and clumping. Once simmering, gently stir constantly until soup appears to thicken slightly. About 5 minutes..
  4. Reduce heat to medium low. Stir in cream cheese until fully melted (this will take about 5 minutes of constant stirring). Reduce heat to low. Stir in cheddar one cup at a time, fully melting each addition before adding the next..
  5. Taste for seasoning and adjust as needed (I usually add more salt and pepper). Serve with garlic bread for dipping and/or a crisp side salad. Enjoy!.

So that is going to wrap it up with this exceptional food beefy mac & cheese soup recipe. Thanks so much for reading. I am confident that you will make this at home. There is gonna be interesting food in home recipes coming up. Don't forget to bookmark this page on your browser, and share it to your loved ones, colleague and friends. Thank you for reading. Go on get cooking!

Simple Way to Prepare Award-winning 🌶️ Teddy's Sambal Tumis (Malayan
chili sauce)

Simple Way to Prepare Award-winning 🌶️ Teddy's Sambal Tumis (Malayan chili sauce)

🌶️ Teddy's Sambal Tumis (Malayan chili sauce).

🌶️ Teddy's Sambal Tumis (Malayan chili sauce)

Hey everyone, I hope you are having an incredible day today. Today, I will show you a way to prepare a special dish, 🌶️ teddy's sambal tumis (malayan chili sauce). One of my favorites food recipes. For mine, I am going to make it a bit unique. This is gonna smell and look delicious.

🌶️ Teddy's Sambal Tumis (Malayan chili sauce) is one of the most well liked of current trending meals in the world. It is easy, it's quick, it tastes yummy. It's enjoyed by millions daily. 🌶️ Teddy's Sambal Tumis (Malayan chili sauce) is something which I have loved my whole life. They are fine and they look fantastic.

To begin with this particular recipe, we have to first prepare a few components. You can have 🌶️ teddy's sambal tumis (malayan chili sauce) using 18 ingredients and 11 steps. Here is how you cook that.

The ingredients needed to make 🌶️ Teddy's Sambal Tumis (Malayan chili sauce):

  1. {Take of A. Ingredients for the SPICE PASTE.
  2. {Get of □ 2 cups of dried chilies, deseeded, presoaked in hot water until plump.
  3. {Prepare of □ 1 ½ cups of shallots.
  4. {Get of □ 1 medium red onion (about 1/3 cup), roughly chopped.
  5. {Get of □ 5 slices of galangal, approx. 1.5"inch x 1".
  6. {Prepare of □ 3 cloves of garlic.
  7. {Make ready of □ □ 1 tbsp of belachan or a slice in a square 1.5"x 1.5", dry toasted until slightly browned.
  8. {Make ready of ---------------------------------------.
  9. {Get of B. Ingredients to cook Sambal Tumis.
  10. {Get of □ Seasoning:.
  11. {Take 1 1/2 tsp of salt.
  12. {Get 1 tbsp of palm sugar or Gula Melaka, grate first if comes in cylinders or blocks. Tip: Use a veggie peeler or bread knife to scrape.
  13. {Take 2 1/2 tbsp of date sugar.
  14. {Prepare of □ Spice Paste (from doing above step).
  15. {Prepare of □ 7 tbsp of oil (organic canola oil recommended), a little less than half a cup.
  16. {Take of □ Optional: 4 pandan or screwpine leaves, bundled into a knot.
  17. {Take of □ 1/4 cup of tamarind juice (from 1½ tbsp of tamarind pulp loosened by hand and strained in 1/4 cup of water).
  18. {Make ready of □ 2 tbsp of natural honey.

Steps to make 🌶️ Teddy's Sambal Tumis (Malayan chili sauce):

  1. PREP WORK- Soak chilies in hot water an hour before use. Dried red chilies will fully plump up when ready to use. Remember to deseed..
  2. SPICE PASTE - Blend all ingredients for SPICE PASTE to a smooth paste. Add small amounts of water to help the process but do not flood it. Use just enough to keep the blades moving. Hardy herbs/rhizomes like galangal should be cut small first before blending, so there are no long fibrous strands to contend with when eating..
  3. COOK SAMBAL TUMIS - 1. Bring a wok to medium high heat and add oil. Wok should be mildly smoking but not burning hot..
  4. 2. Add spice paste carefully. It will sizzle and splatter. Stir to prevent burning..
  5. 3. Allow to cook for 6 -12 mins until ‘oil breaks’ and separates from paste or when dry, clumpy and translucent. We are just seeing that everything is cooked through in the spice paste before proceeding..
  6. 4. Add 2 cups of water and tamarind juice just before it dries out and burns, season the sambal with salt, palm sugar and date sugar..
  7. 5. Stir and lower heat to prevent burning. It should still be gently bubbling. Add the optional knot of pandan leaves to lend a vanilla-like aroma..
  8. 6. Allow the sambal to come together, every few minutes giving it a swirl to prevent burning. Add water if it begins to dry out – not too much, no more than half cup each time..
  9. 7. When the oil floats and the color has changed to a dark crimson shade, the sambal is done (about 35 mins)..
  10. 8. Adjust with salt or additional tamarind juice to increase sourness. Turn off the heat, remove the pandan knot if added..
  11. 9. When the sambal has cooled down, spoon in honey and mix well. Keep refrigerated or freeze in small batches for reuse on another day or when you make Nasi Lemak..

So that's going to wrap this up for this special food 🌶️ teddy's sambal tumis (malayan chili sauce) recipe. Thanks so much for your time. I am sure you can make this at home. There is gonna be interesting food at home recipes coming up. Don't forget to bookmark this page in your browser, and share it to your family, friends and colleague. Thanks again for reading. Go on get cooking!

Recipe of Perfect Healthy Mug Cake

Recipe of Perfect Healthy Mug Cake

Healthy Mug Cake.

Healthy Mug Cake

Hello everybody, hope you're having an incredible day today. Today, I'm gonna show you how to make a distinctive dish, healthy mug cake. It is one of my favorites food recipes. This time, I am going to make it a bit tasty. This will be really delicious.

Healthy Mug Cake is one of the most favored of recent trending meals in the world. It's easy, it's quick, it tastes yummy. It is appreciated by millions daily. Healthy Mug Cake is something that I've loved my whole life. They are fine and they look fantastic.

To begin with this particular recipe, we have to first prepare a few ingredients. You can cook healthy mug cake using 8 ingredients and 3 steps. Here is how you cook it.

The ingredients needed to make Healthy Mug Cake:

  1. {Prepare 1/8 C of Quickoats.
  2. {Prepare 1/8 tsp. of baking powder (I used a slight bit less).
  3. {Take 1 TB of Cocoa.
  4. {Get 1 TB of Peanut Butter.
  5. {Take 1 TB of Coconut Oil.
  6. {Make ready 1 TB of Maple Syrup.
  7. {Make ready 1/8 C of almond Milk.
  8. {Prepare Handful of Chocolate Chips.

Steps to make Healthy Mug Cake:

  1. Add all the dry ingredients in a mug, and mix well..
  2. Add the rest of the ingredients minus the chocolate chips, and stir thoroughly until a batter is formed..
  3. Add in the amount of chocolate chips you prefer (I usually put in a small handful), stir, and then add a few on top. Place in microwave for 1:30, enjoy!!.

So that is going to wrap it up with this exceptional food healthy mug cake recipe. Thank you very much for reading. I am confident you can make this at home. There's gonna be interesting food in home recipes coming up. Remember to save this page in your browser, and share it to your loved ones, friends and colleague. Thank you for reading. Go on get cooking!

Step-by-Step Guide to Prepare Favorite Chicken Alfredo

Step-by-Step Guide to Prepare Favorite Chicken Alfredo

Chicken Alfredo.

Chicken Alfredo

Hello everybody, it is Drew, welcome to my recipe page. Today, we're going to make a distinctive dish, chicken alfredo. One of my favorites. This time, I am going to make it a little bit unique. This is gonna smell and look delicious.

Chicken Alfredo is one of the most popular of recent trending foods on earth. It's simple, it's quick, it tastes delicious. It's appreciated by millions every day. They're fine and they look fantastic. Chicken Alfredo is something that I've loved my whole life.

To begin with this recipe, we have to first prepare a few components. You can have chicken alfredo using 15 ingredients and 4 steps. Here is how you cook it.

The ingredients needed to make Chicken Alfredo:

  1. {Prepare of Alfredo Sauce.
  2. {Get 1 stick of butter.
  3. {Get 2 cups of grated Parmesan cheese.
  4. {Make ready 1 cup of heavy whipping cream.
  5. {Take of Chicken.
  6. {Make ready 2 pound of chicken breast boneless and skinless.
  7. {Prepare 24 ounces of Brussel sprouts.
  8. {Get 1/2 pound of carrots.
  9. {Take To taste of salt.
  10. {Get 3 tablespoons of peanut oil.
  11. {Prepare 1/2 teaspoon of ground white pepper.
  12. {Make ready 1 teaspoon of granulated garlic powder.
  13. {Get 1/4 cup of parsley flakes.
  14. {Get 1 tablespoon of chopped chives.
  15. {Prepare 3 tablespoons of grated Parmesan cheese for top.

Instructions to make Chicken Alfredo:

  1. Melt the butter add the cream and allow to heat. Get hot enough just to melt cheese. Whisk till smooth and creamy..
  2. Add oil to pan. Slice the carrots on a bias. Cut the sprouts in half. Add to the oven safe pot, or Dutch oven. Preheat oven to 400°Fahrenheit. Slice the chicken into manageable pieces. Add spices..
  3. When all the spices are in mix well and cook till chicken is no longer pink. When the vegetables are tender add the Alfredo sauce..
  4. Sprinkle with a little parmesan cheese and put into oven for 1 hour. Serve I hope you enjoy!!!.

So that is going to wrap it up with this exceptional food chicken alfredo recipe. Thank you very much for reading. I am confident you can make this at home. There's gonna be interesting food in home recipes coming up. Don't forget to save this page in your browser, and share it to your loved ones, friends and colleague. Thank you for reading. Go on get cooking!

How to Make Ultimate Hibachi rice and chicken

How to Make Ultimate Hibachi rice and chicken

Hibachi rice and chicken. Heat vegetable oil on medium high in large skillet or wok (use the skillet or wok you cooked the chicken in earlier). This Hibachi Chicken was the first recipe I have ever made at home. It was simple and really enjoyed how it gave the rice and veggie recipes along too.

Hibachi rice and chicken Cook the chicken and veggies at the same time in two separate skillets or woks. Hibachi-style fried rice cooked with chicken, green onions, and eggs is a quick and easy side dish to an Asian-inspired meal. Instead of chicken I used chopped shiitake mushrooms and peas.

Hey everyone, it's Brad, welcome to my recipe page. Today, I will show you a way to make a special dish, hibachi rice and chicken. It is one of my favorites. For mine, I will make it a bit tasty. This will be really delicious.

Hibachi rice and chicken is one of the most popular of recent trending foods in the world. It is enjoyed by millions every day. It is easy, it is quick, it tastes delicious. Hibachi rice and chicken is something that I have loved my entire life. They're fine and they look fantastic.

Heat vegetable oil on medium high in large skillet or wok (use the skillet or wok you cooked the chicken in earlier). This Hibachi Chicken was the first recipe I have ever made at home. It was simple and really enjoyed how it gave the rice and veggie recipes along too.

To begin with this recipe, we have to prepare a few ingredients. You can have hibachi rice and chicken using 8 ingredients and 9 steps. Here is how you cook it.

The ingredients needed to make Hibachi rice and chicken:

  1. {Get 3 of chicken breasts.
  2. {Prepare 2 cups of frozen peas, carrots and broccoli.
  3. {Make ready 1 teaspoon of onion powder.
  4. {Take 1 tablespoon of garlic powder.
  5. {Make ready of salt and pepper.
  6. {Prepare of soy sauce.
  7. {Prepare 2 of eggs.
  8. {Get of butter.

It was Delish and it the spot for my fried rice craving! Japanese style Hibachi Chicken made with sautéed vegetables served over rice and topped with YUM YUM SAUCE! An easy weeknight dinner that will have you feel like you're eating out! Quick and easy hibachi fried rice recipe.

Instructions to make Hibachi rice and chicken:

  1. Cook 2 cups of rice in 2 1/4 plus cups of water, or to directions on rice.
  2. Cook chicken in medium skillet, don't overcook. 2.5 min each side on high, 12 min on 4.5. Flipping occasionally.
  3. Beat eggs in bowl, Coat large skillet in Pam or oil and cook eggs, chop them up and return to bowl.
  4. Coat large skillet with some butter and add vegetables.
  5. Add about half of the onion powder, garlic powder, salt and pepper. Add some soy sauce to color.
  6. Once veggies near cooked and chicken near cooked, cut up chicken into pieces and add to large skillet.
  7. Add rest of spices and some more soy sauce, cook for a few minutes, make sure chicken is done.
  8. Add egg back in.
  9. Add rice to skillet, add soy sauce so rice is evenly brown.

It's easy to throw together to serve with sautéed chicken, steak, salmon, or shrimp! This hibachi chicken recipe is by far the easiest and the most effective way to make hibachi chicken at home that I know of, and only takes minutes to prepare. I am a sucker for juicy, buttery, melt-in-you-mouth tender hibachi chicken, served with hibachi-style rice and grilled vegetables. Skinless boneless thin sliced chicken breasts Onion Zucchini Sliced mushrooms Broccoli Olive oil Less sodium soy sauce Butter Salt & Pepper Lemon juice. Serve the hibachi chicken with a bed of fried or steamed rice.

So that's going to wrap this up with this special food hibachi rice and chicken recipe. Thanks so much for your time. I'm sure that you can make this at home. There's gonna be more interesting food in home recipes coming up. Remember to save this page in your browser, and share it to your family, friends and colleague. Thank you for reading. Go on get cooking!

Simple Way to Make Any-night-of-the-week Another way GULAB JAMUN🌹

Simple Way to Make Any-night-of-the-week Another way GULAB JAMUN🌹

Another way GULAB JAMUN🌹. Angoori Gulab Jamun is a traditional Indian dessert loved and enjoyed by every age group. Small spongy pearl shaped anguri/angoori gulab jamun are prepared. Gulab jamun recipe is especially dear to me as it was my very first video showcased on You Tube.

Another way GULAB JAMUN🌹 This recipe is simpler, yet still delicious. Angoori Gulab Jamun is a traditional Indian dessert loved and enjoyed by every age group. Small spongy pearl shaped anguri/angoori gulab jamun are prepared with mawa/khoya and soaked in sugar syrup.

Hello everybody, it's me, Dave, welcome to our recipe site. Today, I will show you a way to make a distinctive dish, another way gulab jamun🌹. It is one of my favorites. This time, I'm gonna make it a little bit unique. This will be really delicious.

Angoori Gulab Jamun is a traditional Indian dessert loved and enjoyed by every age group. Small spongy pearl shaped anguri/angoori gulab jamun are prepared. Gulab jamun recipe is especially dear to me as it was my very first video showcased on You Tube.

Another way GULAB JAMUN🌹 is one of the most well liked of current trending meals on earth. It's appreciated by millions every day. It's simple, it is fast, it tastes yummy. They're fine and they look fantastic. Another way GULAB JAMUN🌹 is something which I have loved my whole life.

To begin with this recipe, we must first prepare a few ingredients. You can cook another way gulab jamun🌹 using 9 ingredients and 4 steps. Here is how you cook that.

The ingredients needed to make Another way GULAB JAMUN🌹:

  1. {Prepare 2 cup of milk powder.
  2. {Make ready of Milk for dough.
  3. {Make ready 4 tbsp of desi ghee.
  4. {Take 1 tbsp of baking powder.
  5. {Make ready 1 tbsp of wheat flour.
  6. {Take of Cardamom crushed.
  7. {Prepare 1 tbsp of lemon juice.
  8. {Take 2 cups of sugar.
  9. {Get 2 cup of water.

They get their name Angoori, because of their size. Since they are petite and small just like. Gulab Jamun is a classic dessert. What is not to love about a deep fried dough that is suspended in Your Gulab Jamuns are done.

Instructions to make Another way GULAB JAMUN🌹:

  1. Mix milk powder+1 cup milk.whisk well and take a pan.add 2 tbsp ghee and pour milk powder mixture.cook at low flame and make a thick mixture called instant MAVA..
  2. Make a dough like mixture and let it cool down.then add 1 tbsp wheat flour and add little ghee if needed.make a smooth dough by adding baking powder.add milk to make smooth soft dough if milk is needed..
  3. Let it rest for 15 minutes.make oil hot for fry.now turn flame low.other side in another pan put 2 cup sugar and water and cardamom and simmer to make syrup.after 5 minutes add lemon juice.make very tiny balls of dough and deep fry 8 to 10 balls in once..
  4. Add immediately in syrup and keep remember syrup should flowing not like thick chashni.keep gulab jamun dipped in syrup at off gas.no need to boil.wait for 1 hour and enjoy so yumm gulab jamun in another way.

Khoya gulab jamun recipe with video & step by step photos - Traditional gulab jamun recipe made with khoya. Wishing all the readers a very happy, prosperous and safe Diwali. There are also many modern versions of making gulab jamun using milk powder, potato, sweet potato and even with bread. Gulab Jamun is one of the most popular traditional Indian desserts. This rich dessert delicacy is traditionally made with milk solids.

So that is going to wrap it up with this exceptional food another way gulab jamun🌹 recipe. Thanks so much for your time. I'm confident that you will make this at home. There's gonna be more interesting food in home recipes coming up. Don't forget to bookmark this page on your browser, and share it to your loved ones, colleague and friends. Thank you for reading. Go on get cooking!

Simple Way to Make Homemade Winter Melon and Tomato Simmer

Simple Way to Make Homemade Winter Melon and Tomato Simmer

Winter Melon and Tomato Simmer.

Winter Melon and Tomato Simmer

Hey everyone, it is John, welcome to our recipe page. Today, we're going to make a special dish, winter melon and tomato simmer. One of my favorites food recipes. For mine, I will make it a little bit tasty. This is gonna smell and look delicious.

Winter Melon and Tomato Simmer is one of the most popular of recent trending meals in the world. It is easy, it is fast, it tastes yummy. It is appreciated by millions every day. Winter Melon and Tomato Simmer is something that I've loved my entire life. They are nice and they look wonderful.

To begin with this particular recipe, we must first prepare a few components. You can have winter melon and tomato simmer using 10 ingredients and 5 steps. Here is how you cook it.

The ingredients needed to make Winter Melon and Tomato Simmer:

  1. {Take 400 grams of Winter melon.
  2. {Get 1 of thigh Chicken thigh.
  3. {Get 1/2 of Onion.
  4. {Take 1 tbsp of Vegetable oil.
  5. {Make ready 100 ml of ★ Water.
  6. {Take 2 of ★ Buillion cube.
  7. {Make ready 400 of grams/can ★ Canned diced tomatoes.
  8. {Get 40 grams of Grated cheese.
  9. {Get 1 dash of Salt and pepper.
  10. {Prepare 1 of to garnish Parsley.

Instructions to make Winter Melon and Tomato Simmer:

  1. Remove the rind, seeds, and insides from the winter melon and cut into bite-sized cubes (about 2 cm)..
  2. Cut the onion into 1 cm cubes and the chicken into bite-sized pieces. Lightly flavor with salt and pepper..
  3. Add some vegetable oil to a frying pan and brown the chicken on high heat. Reduce to medium heat and add the onions..
  4. Once the onions have become translucent, add the ★ ingredients and the winter melon. Once it comes to a boil, cover and simmer for about 20 minutes on medium heat..
  5. Transfer to serving dishes, top with the grated cheese, and garnish with parsley if desired..

So that's going to wrap this up for this exceptional food winter melon and tomato simmer recipe. Thanks so much for reading. I'm sure that you can make this at home. There is gonna be more interesting food at home recipes coming up. Remember to bookmark this page on your browser, and share it to your family, friends and colleague. Thanks again for reading. Go on get cooking!

Steps to Make Perfect Loaded Pulled pork fries

Steps to Make Perfect Loaded Pulled pork fries

Loaded Pulled pork fries.

Loaded Pulled pork fries

Hello everybody, it's Brad, welcome to my recipe page. Today, I'm gonna show you how to prepare a special dish, loaded pulled pork fries. One of my favorites food recipes. For mine, I'm gonna make it a bit tasty. This is gonna smell and look delicious.

Loaded Pulled pork fries is one of the most well liked of recent trending foods in the world. It is appreciated by millions every day. It's easy, it is quick, it tastes yummy. Loaded Pulled pork fries is something that I've loved my entire life. They're fine and they look fantastic.

To begin with this recipe, we have to first prepare a few components. You can have loaded pulled pork fries using 9 ingredients and 3 steps. Here is how you cook it.

The ingredients needed to make Loaded Pulled pork fries:

  1. {Take 2 1/2 lbs of pork shoulder.
  2. {Prepare 1 cup of root beer.
  3. {Prepare 2 cups of bbq sauce.
  4. {Get 1 bag of frozen fries.
  5. {Take of Green onions Chopped.
  6. {Take 1 cup of sour cream.
  7. {Get 2 cups of cheddar cheese shredded.
  8. {Make ready of Side.
  9. {Take of Salad.

Steps to make Loaded Pulled pork fries:

  1. Add pork shoulder, root beer, bbq, in slow cooker. Cook for 8-10 hrs on low..
  2. Shred pork, cook fries according to package directions (I cook my fries in the oven on a baking sheet make step 3 easier that way.).
  3. Layer pork and cheese on top of fries return to oven for 4-10 minutes until cheese is melted garnish with sliced onions and sour cream serve salad.

So that's going to wrap this up with this exceptional food loaded pulled pork fries recipe. Thank you very much for reading. I'm confident that you can make this at home. There's gonna be interesting food at home recipes coming up. Remember to save this page on your browser, and share it to your family, colleague and friends. Thanks again for reading. Go on get cooking!

Step-by-Step Guide to Prepare Award-winning Russian Tea Cakes from the
settlement cookbook -1965

Step-by-Step Guide to Prepare Award-winning Russian Tea Cakes from the settlement cookbook -1965

Russian Tea Cakes from the settlement cookbook -1965.

Russian Tea Cakes from the settlement cookbook -1965

Hey everyone, hope you're having an incredible day today. Today, we're going to prepare a special dish, russian tea cakes from the settlement cookbook -1965. One of my favorites food recipes. This time, I will make it a little bit tasty. This is gonna smell and look delicious.

Russian Tea Cakes from the settlement cookbook -1965 is one of the most favored of recent trending meals on earth. It is easy, it's fast, it tastes delicious. It's enjoyed by millions every day. Russian Tea Cakes from the settlement cookbook -1965 is something that I have loved my entire life. They're nice and they look fantastic.

To begin with this particular recipe, we must prepare a few ingredients. You can cook russian tea cakes from the settlement cookbook -1965 using 7 ingredients and 11 steps. Here is how you cook it.

The ingredients needed to make Russian Tea Cakes from the settlement cookbook -1965:

  1. {Take 1 cup of Eggs, whites and yolks mixed.
  2. {Get 1 cup of sugar.
  3. {Make ready 1 cup of sour cream.
  4. {Prepare 4-6 Cups of flour.
  5. {Get 1 1/2 Cups of butter.
  6. {Take 1 cup of chopped almonds.
  7. {Make ready of Sugar and cinnamon.

Instructions to make Russian Tea Cakes from the settlement cookbook -1965:

  1. Mix Eggs, sugar and cream, and add enough flour To make a dough that can be handled..
  2. Roll out 1/4- inch thick into a rectangle 3 times as long as wide..
  3. Spread half the butter thinly over the right - hand 2- thirds of the dough..
  4. Fold the left hand third over this..
  5. Roll out and chill..
  6. Repeat with remaining butter..
  7. Chill well..
  8. Divide dough into 4 parts..
  9. Roll each part into a rectangle, as thin as possible, sprinkle with some of the chopped almonds, sugar and cinnamon, and roll..
  10. Cut in slices, sprinkle with the rest of the almonds, sugar and cinnamon..
  11. Bake cut - side down on a baking sheet in a hot oven (400f) until delicately browned..

So that's going to wrap this up for this exceptional food russian tea cakes from the settlement cookbook -1965 recipe. Thanks so much for your time. I am sure you can make this at home. There is gonna be interesting food in home recipes coming up. Don't forget to save this page in your browser, and share it to your family, colleague and friends. Thanks again for reading. Go on get cooking!